Use a script to setup your SD card
This page provides instructions for installing libraries necessary for operating the MuSHR racecar. Before proceeding with these instructions, we first suggest trying our Jetson Nano image that has everything described on this page already installed. However, if your Jetson Nano fails to boot when using our image, you can flash NVIDIA’s stock Jetson Nano image to your SD card, and then follow these instructions to install the necessary libraries.
Prerequisites
The following are required before continuing with installing the necessary libraries.
- SD card flashed with the NVIDIA Jetpack 4.2 stock image. Press “Download SD Card Image” and then follow the steps here (starting from step 2) to flash your SD card.
- Internet connection for Jetson Nano (either WiFi or ethernet)
- HDMI cable, mouse, keyboard
Running Install Script
The following steps will setup the required libraries on the Jetson Nano.
Power on and boot the Jetson Nano.
Follow the on-screen prompts to complete setup of the Jetson Nano operating system. If you would like your setup to be consistent with our tutorials, we suggest using the following values:
Username: robot
Name: robot
Computer Name: gooseDownload the install script:
wget https://raw.githubusercontent.com/prl-mushr/mushr/master/mushr_utils/install_scripts/mushr_install.shMake the install script executable:
chmod +x mushr_install.shExecute the script, following the prompts and entering the user password as needed:
./mushr_install.shPlug in any realsense cameras and open the realsense viewer:
realsense-viewer
If the upper right hand corner of the GUI recommends a firmware update, download and install the updated firmware.Open the file ~/catkin_ws/src/mushr/mushr_hardware/mushr_hardware/launch/racecar-uw-nano/sensors.launch. Comment out the lines that launch rs_camera.launch, and add the following code as shown in Fig. 1.
<node pkg="timed_roslaunch" type="timed_roslaunch.sh"
      args="10 realsense2_camera rs_camera.launch camera:=/$(arg car_name)/camera tf_prefix:=/$(arg car_name)/camera"
      name="rs_camera_timed_roslaunch" output="screen" />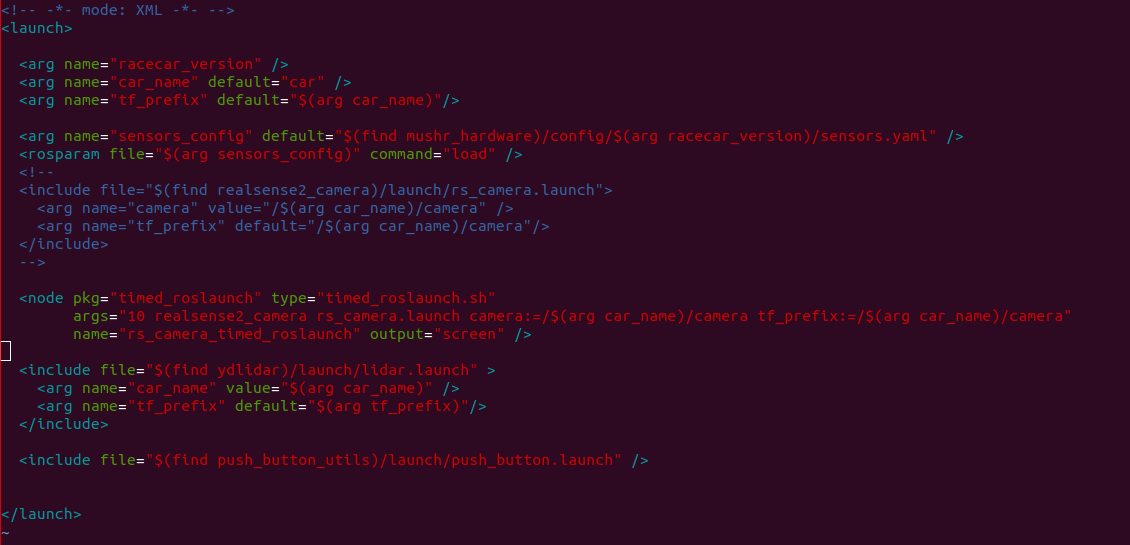
Fig. 1
Setup an access point on the robot. To do this, first click on the Wi-Fi symbol in the upper right of the Ubuntu GUI and choose Edit Connections. Click the plus sign to create a new connection. On the Choose a Connection Type dialog, choose Wi-Fi from the drop down menu, and then click Create…. Enter the name Robot AP into the Connection Name field. Under the Wi-Fi tab, also enter Robot AP into the SSID field. Under the Mode field, choose Hotspot. Under the BSSID field, choose the last option (there may only be one option). Under the Wi-Fi Security tab, choose the WPA and WPA2 Personal option in the Security field. Then enter a password into the Password field. Then click Save. This setup is shown below in Fig. 2 and 3.

Fig. 2
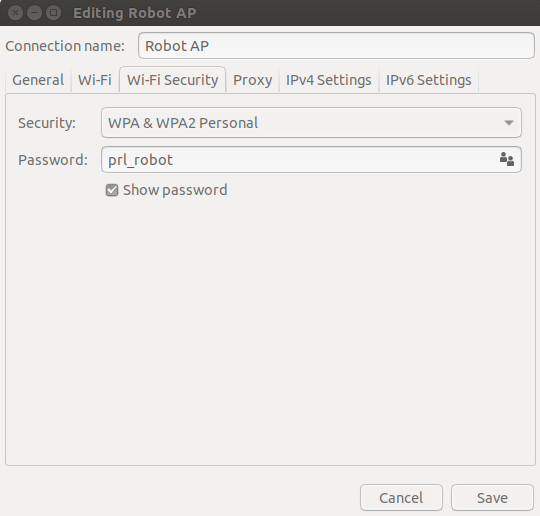
Fig. 3
Some changes only take effect after re-booting, so shutdown the robot.
sudo shutdown -P nowAll of the necessary libraries should now be installed. Now continue finishing software setup here.