Car Pose Detection and Yolo Learning

Train a model to detect MuSHR cars.

Intermediate Tutorial | Expected duration is 60 minutes

By: Tudor Fanaru & Sean Chen


Introduction

Goal

In a multi-agent system, car detection is one of the fundamental processes that must take place in order for cars to make decisions from their oberservations. This applies to collision avoidance & navigation, as well as any other form of cooperative task. This tutorial will provide instructions for producing bounding prisms to label cars based on mocap car pose data, and training a model from your newly labeled data.

Requirements

Mathematical Explanations

It is important to remember that the sensor measurements from the cars and mocap all have their own frame of reference. In order to combine these into a bounding box within a single car’s camera frame, we need to be able to switch between frames of reference in a computationally effective way. This is done through the use of transforms. There are 4 important frames of reference: the world (where the mocap marker is tracked), the base_link (root of a car’s tf tree), the camera on the car, and the centroid of a car (used to generate a bounding prism). Being able to move between these frames of reference is necessary to derive the true position of a car on a camera frame, and create a corresponding label.

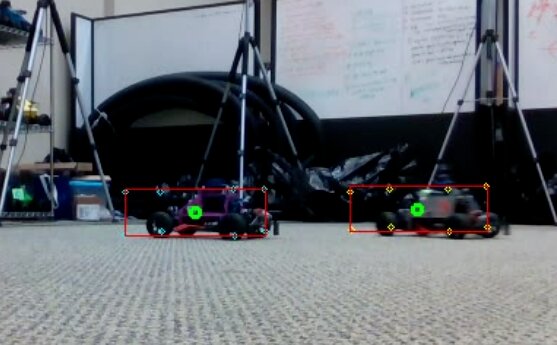
In this example, car 1 is being viewed by car 2’s camera. Let x_T_y mean the transform of x w.r.t. y:

  • marker1_T_cam2 = base2_T_cam2 * marker2_T_base2 * world_T_marker2 * marker1_T_world
  • center1_T_cam2 = marker1_T_cam2 * base1_T_marker1 * center1_T_base1

marker1_T_world and marker2_T_world are given by the mocap data world_T_marker2 is the inverse of marker2_T_world base_T_cam, marker_T_base, center_T_base are all constants depending on how you set up your system

Bag Creation:

Whether you create your own dataset using your own bag(s), or you use ours, these are the key ROS topics for each car:

  • d435 color camera: /carXX/camera/color/image_throttled
  • mocap pose: /vrpn_client_node/carXX/pose
  • camera parameters: /carXX/camera/color/camera_info

You can download our bag to see how we gathered data, or to follow along the rest of the tutorial with.

Creating Your Dataset:

Now that you have a bag, you will use gen_darknet_label.py to create your labels & dataset in the darknet format. The implementation of YOLOv5 we are using requires the dataset to be in darknet format:

  • bounding boxes are represented by (x_center, y_center, w, h)
  • each value is in terms of the dimension of the image between 0 and 1

Create a dataset directory, and create two subdirectories: images & labels. Run the gen_darknet_label.py script to populate the directories with images and labels. When finished, your dataset directory should look like this:

	dataset/

		images/
			img_000000.jpg
			img_000001.jpg
			...
		labels/
			img_000000.txt
			img_000001.jpg
			...

You can download our dataset to jump right into the machine-learning aspect of this tutorial.

Labeling Implementation

The entire implementation code can be found at the car pose detection repo.

After importing all the necessary modules and defining constants, the first thing the script will do is process the entire bag looking for the topics listed above. You will want:

  • The pose of each car
  • The camera frames and camera info from one car
 1
 2
 3
 4
 5
 6
 7
 8
 9
10
11
12
13
14
15
16
17
18
19
20
21
22
23
24
25
26
27
28
29
30
31
32
33
34
35
36
37
38
39
40
41
42
43
44
45
46
47
48
49
50
51
52
53
54
55
56
57
58
59
60
61
62
63
64
65
66
67
68
69
70
71
72
73
74
75
76
77
78
79
80
81
82
83
84
85
86
87
	import rosbag
	import numpy as np
	import tf
	import rospy
	import cv2
	from cv_bridge import CvBridge
	from image_geometry import PinholeCameraModel

	PATH_TO_INPUT_BAG = '/home/tudorf/mushr/catkin_ws/src/learning-image-geometry/car37_longtrim.bag'
	OUTPUT_VIDEO_NAME = 'test'
	OUTPUT_VIDEO_FPS = 9

	transformerROS = tf.TransformerROS()
	bridge = CvBridge()
	camModel = PinholeCameraModel()
	vid_out = cv2.VideoWriter(OUTPUT_VIDEO_NAME + '.avi', cv2.VideoWriter_fourcc(*'MJPG'), OUTPUT_VIDEO_FPS, (640,480))

	def translate_transform(p):
		t = np.eye(4)
		t[0,3] = p[0]
		t[1,3] = p[1]
		t[2,3] = p[2]
		return t

	def inverse_transform(t):
		R_inv = t[:3,:3].T
		p_inv = np.matmul(-R_inv,t[:3,3])
		t_inv = np.eye(4)
		t_inv[0,0] = R_inv[0,0]
		t_inv[0,1] = R_inv[0,1]
		t_inv[0,2] = R_inv[0,2]
		t_inv[1,0] = R_inv[1,0]
		t_inv[1,1] = R_inv[1,1]
		t_inv[1,2] = R_inv[1,2]
		t_inv[2,0] = R_inv[2,0]
		t_inv[2,1] = R_inv[2,1]
		t_inv[2,2] = R_inv[2,2]
		t_inv[0,3] = p_inv[0]
		t_inv[1,3] = p_inv[1]
		t_inv[2,3] = p_inv[2]
		return t_inv

	def get_corners(center_T_cam):
		# center_T_cam is the transform of centerXX in terms of camYY, where we want the corners of carXX in terms of camYY
		# dx,y,z are the dimensions of the car in the x,y,z directions from the center
		dx = 0.22
		dy = 0.134
		dz = 0.079
		return [
			np.matmul(center_T_cam, translate_transform([ dx,  dy,  dz])),
			np.matmul(center_T_cam, translate_transform([ dx, -dy,  dz])),
			np.matmul(center_T_cam, translate_transform([ dx,  dy, -dz])),
			np.matmul(center_T_cam, translate_transform([ dx, -dy, -dz])),
			np.matmul(center_T_cam, translate_transform([-dx,  dy,  dz])),
			np.matmul(center_T_cam, translate_transform([-dx, -dy,  dz])),
			np.matmul(center_T_cam, translate_transform([-dx,  dy, -dz])),
			np.matmul(center_T_cam, translate_transform([-dx, -dy, -dz]))
		]

	# constant transforms
	trackedPt_T_baselink = translate_transform([-0.058325, 0, 0.08125])
	colorCam_T_baselink = translate_transform([0.02, 0.033, 0.068])
	center_T_baselink = translate_transform([-0.015, 0.0, 0.003])
	baselink_T_trackedPt = inverse_transform(trackedPt_T_baselink)

	bag = rosbag.Bag(PATH_TO_INPUT_BAG)
	# subscribe to all /vrpn_client_node/carXX/pose for cars in dataset
	# subscribe to '/carXX/camera/color/camera_info' and '/carXX/camera/color/image_throttled' for camera car
	topics = ['/vrpn_client_node/car35/pose','/vrpn_client_node/car37/pose','/vrpn_client_node/car38/pose','/car37/camera/color/camera_info','/car37/camera/color/image_throttled']

	ps_35 = []
	ps_37 = []
	ps_38 = []
	camInfo = None
	cam_37 = []

	for topic, msg, t in bag.read_messages(topics=topics):
		if topic == '/vrpn_client_node/car35/pose':
			ps_35.append((t, msg.pose))
		elif topic == '/vrpn_client_node/car37/pose':
			ps_37.append((t, msg.pose))
		elif topic == '/vrpn_client_node/car38/pose':
			ps_38.append((t, msg.pose))
		elif topic == '/car37/camera/color/camera_info':
			camInfo = msg
		elif topic == '/car37/camera/color/image_throttled':
			cam_37.append((t, msg))

Next, it will step over each video frame. Since the motion capture data is published at a much higher rate, we must find the mocap data to each video frame. Each message of a rostopic has a timestamp, so we pick the mocap message with the closest timestamp to the video frame’s timestamp.

 88
 89
 90
 91
 92
 93
 94
 95
 96
 97
 98
 99
100
101
102
103
104
105
106
107
108
109
110
111
112
113
	idx35 = 0
	idx37 = 0
	idx38 = 0

	for idxImg in range(len(cam_37)):
		targetT = cam_37[idxImg][0]
		while idx35< len(ps_35)-1   and ps_35[idx35][0]   < targetT: idx35 += 1
		while idx37< len(ps_37)-1   and ps_37[idx37][0]   < targetT: idx37 += 1
		while idx38< len(ps_38)-1   and ps_38[idx38][0]   < targetT: idx38 += 1

		# pick closest mocap data, not next
		if idx35 > 0 and targetT - ps_35[idx35-1][0] < ps_35[idx35][0] - targetT:
			idx35 -= 1
		if idx37 > 0 and targetT - ps_37[idx37-1][0] < ps_37[idx37][0] - targetT:
			idx37 -= 1
		if idx38 > 0 and targetT - ps_38[idx38-1][0] < ps_38[idx38][0] - targetT:
			idx38 -= 1

		# unwrap mocap pose into position, orientation
		pos35 = ps_35[idx35][1].position
		ori35 = ps_35[idx35][1].orientation
		pos37 = ps_37[idx37][1].position
		ori37 = ps_37[idx37][1].orientation
		pos38 = ps_38[idx38][1].position
		ori38 = ps_38[idx38][1].orientation  
		

Next, we create and use transforms to identify where the other cars’ corners are on the frame. We load in the frame as an OpenCV image. Should you need to debug, you can draw the points of interest on the frame.

113
114
115
116
117
118
119
120
121
122
123
124
125
126
127
128
129
130
131
132
133
134
    # create Transforms for TrackedPts w.r.t. World
    pt35_T_w = transformerROS.fromTranslationRotation((pos35.x, pos35.y, pos35.z), (ori35.x, ori35.y, ori35.z, ori35.w))
    pt37_T_w = transformerROS.fromTranslationRotation((pos37.x, pos37.y, pos37.z), (ori37.x, ori37.y, ori37.z, ori37.w))
    pt38_T_w = transformerROS.fromTranslationRotation((pos38.x, pos38.y, pos38.z), (ori38.x, ori38.y, ori38.z, ori38.w))

    # create Transforms for points of interest w.r.t. World
    base37_T_w = np.matmul(pt37_T_w, baselink_T_trackedPt)
    cam37_T_w = np.matmul(base37_T_w, colorCam_T_baselink)

    base35_T_w = np.matmul(pt35_T_w, baselink_T_trackedPt)
    center35_T_w = np.matmul(base35_T_w, center_T_baselink)
    base38_T_w = np.matmul(pt38_T_w, baselink_T_trackedPt)
    center38_T_w = np.matmul(base38_T_w, center_T_baselink)

    # create Transforms for points of interest w.r.t. Camera
    w_T_cam37 = inverse_transform(cam37_T_w)
    center38_T_cam37 = np.matmul(w_T_cam37, center38_T_w)
    center35_T_cam37 = np.matmul(w_T_cam37, center35_T_w)

    # create Transforms for bounding box corners
    corners35 = get_corners(center35_T_cam37)
    corners38 = get_corners(center38_T_cam37)

Once we’ve found where each bounding box is, we have to decide whether or not to include it in the dataset. First we reject all labels of cars behind the camera. We also wish to throw out a label when one car is occluding another - we only want the front car to be labeled in this case. Finally we save the image and its label in their corresponding locations.

135
136
137
138
139
140
141
142
143
144
145
146
147
148
149
150
151
152
153
154
155
156
157
158
159
160
161
162
163
164
165
166
167
168
169
170
171
172
173
174
175
176
177
178
179
180
181
182
183
184
185
186
187
188
189
190
191
192
193
194
195
196
197
198
199
200
201
202
203
204
205
206
207
208
209
210
211
212
213
214
215
216
217
218
219
220
221
222
223
224
225
226
227
228
229
230
231
232
233
234
235
    # convert to OpenCV image
    car37_image = bridge.imgmsg_to_cv2(cam_37[idxImg][1], "bgr8")

    # find pixel coordinates of centroids
    # the Camera Pinhole model uses +x right, +y down, +z forward
    center35_3d = (-center35_T_cam37[1,3], -center35_T_cam37[2,3], center35_T_cam37[0,3])
    center38_3d = (-center38_T_cam37[1,3], -center38_T_cam37[2,3], center38_T_cam37[0,3])
    camModel.fromCameraInfo(camInfo)
    center35_2d = camModel.project3dToPixel(center35_3d)
    center38_2d = camModel.project3dToPixel(center38_3d)
    center35_round = (int(center35_2d[0]), int(center35_2d[1]))
    center38_round = (int(center38_2d[0]), int(center38_2d[1]))


    # only draw on frame if the observed robot is behind the camera
    car35_rect = None
    if center35_3d[2] > 0:
        # draw centroid
        cv2.circle(car37_image, center35_round, 3, (0,255,0), 2)

        # initialize rectangle bounds to image size
        # cv's image.shape is formatted as (height, width, length) a.k.a. (y, x, z)
        xmin = car37_image.shape[1] + 1
        xmax = -1
        ymin = car37_image.shape[0] + 1
        ymax = -1

        for corneridx, corner in enumerate(corners35):
            # find pixel coordinates of corners
            corner_3d = (-corner[1,3], -corner[2,3], corner[0,3])
            corner_2d = camModel.project3dToPixel(corner_3d)
            corner_round = (int(corner_2d[0]), int(corner_2d[1]))
            # draw the front (first 4) corners in different colors
            color = (255,255,0)
            cv2.circle(car37_image, corner_round, 2, color, 1)

            xmin = min(xmin, corner_round[0])
            xmax = max(xmax, corner_round[0])
            ymin = min(ymin, corner_round[1])
            ymax = max(ymax, corner_round[1])

        # save rectangle
        car35_rect = ((xmin, ymin), (xmax, ymax))
    car38_rect = None
    if center38_3d[2] > 0:
        # draw centroid
        cv2.circle(car37_image, center38_round, 3, (0,255,0), 2)

        # cv's image.shape is formatted as (height, width, length) a.k.a. (y, x, z)
        xmin = car37_image.shape[1] + 1
        xmax = -1
        ymin = car37_image.shape[0] + 1
        ymax = -1

        for corneridx, corner in enumerate(corners38):
            # find pixel coordinates of corners
            corner_3d = (-corner[1,3], -corner[2,3], corner[0,3])
            corner_2d = camModel.project3dToPixel(corner_3d)
            corner_round = (int(corner_2d[0]), int(corner_2d[1]))
            # draw the front (first 4) corners in different colors
            color = (0,255,255)
            cv2.circle(car37_image, corner_round, 2, color, 1)

            xmin = min(xmin, corner_round[0])
            xmax = max(xmax, corner_round[0])
            ymin = min(ymin, corner_round[1])
            ymax = max(ymax, corner_round[1])

        # save rectangle
        car38_rect = ((xmin, ymin), (xmax, ymax))

    # draw rectangles & check for overlap
    overlap_tolerance = 10
    if car35_rect is not None:
        if car38_rect is not None:
            if car35_rect[0][0] > car38_rect[0][0] - overlap_tolerance and car35_rect[0][1] > car38_rect[0][1] - overlap_tolerance and \
                car35_rect[1][0] < car38_rect[1][0] + overlap_tolerance and car35_rect[1][1] < car38_rect[1][1] + overlap_tolerance:
                    # reject draw
                    print('car38 overlaps car35')
            else:
                cv2.rectangle(car37_image, car35_rect[0], car35_rect[1], (0,255,0), 1)
        else:
            cv2.rectangle(car37_image, car35_rect[0], car35_rect[1], (0,255,0), 1)
    
    if car38_rect is not None:
        if car35_rect is not None:
            if car38_rect[0][0] > car35_rect[0][0] - overlap_tolerance and car38_rect[0][1] > car35_rect[0][1] - overlap_tolerance and \
                car38_rect[1][0] < car35_rect[1][0] + overlap_tolerance and car38_rect[1][1] < car35_rect[1][1] + overlap_tolerance:
                    # reject draw
                    print('car35 overlaps car38')
            else:
                cv2.rectangle(car37_image, car38_rect[0], car38_rect[1], (0,0,255), 1)
        else:
            cv2.rectangle(car37_image, car38_rect[0], car38_rect[1], (0,0,255), 1)
    

    # Add frame to video
    vid_out.write(car37_image.astype('uint8'))

	# end video
	vid_out.release()

Setting Up YOLOv5

First clone the YOLOv5 repo: - https://github.com/ultralytics/yolov5

Now install all the requirements from requirements.txt Now create your train/valid/test files. Each file will contain the location of the images you will use for training (the labels will be automatically grabbed since the directory structure is known ahead of time). We split our dataset in a 70/20/10 ratio for train/valid/test, respectively.

Here are the first 3 lines of our train.txt:

  • /mnt/hard_data/carpose/dataset/images/car37_longtrim_000000.jpg
  • /mnt/hard_data/carpose/dataset/images/car37_longtrim_000001.jpg
  • /mnt/hard_data/carpose/dataset/images/car37_longtrim_000002.jpg

Next create carpose.yaml, which will describe the dataset. Fill in the paths to your train/valid/test files. We only have 1 class: Car.

Here is our carpose.yaml file:

# train and val datasets (image directory or *.txt file with image paths)
train: /home/ugrads/WRK/carpose/src/yolov5/data/train.txt
val: /home/ugrads/WRK/carpose/src/yolov5/data/valid.txt
test: /home/ugrads/WRK/carpose/src/yolov5/data/test.txt
# number of classes in your dataset
nc: 1
# class names
names: ['Car']

This file should be in yolov5/data.

Training Your Model

Now we can begin training our model! YOLOv5 has four different model sizes: S, M, L, and XL. We used the smallest: yolov5s.yaml. The parameters we used were: python train.py –data ./data/carpose.yaml –cfg ./models/yolov5s.yaml –logdir /mnt/hard_data/Checkpoints/carpose/runs/ –workers 0 –img-size 640 –single-cls –device 1 –batch 16 –epochs 10 –weights ‘’

Change the logdir to wherever you want the output to be, this will include model checkpoints, plots, and examples from each epoch. The –workers parameter only worked when set to 0 for us. The –device parameter selects which cuda device to use. You can increase/decrease the batch size based on your GPU, and change the training length (epochs). You can also use previously stored weights by filling in the –weights parameter.

Alternatively, you can download our trained model.

Demo Video


Citation

If you plan to use any part of the the MuSHR platform (including tutorials, codebase, or hardware instructions) for a project or paper, please cite MuSHR: A Low-Cost, Open-Source Robotic Racecar for Education and Research.

@article{srinivasa2019mushr,
 title={{MuSHR}: A Low-Cost, Open-Source Robotic Racecar for Education and Research},
 author={Srinivasa, Siddhartha S. and Lancaster, Patrick and Michalove, Johan and Schmittle, Matt and Summers, Colin and Rockett, Matthew and Smith, Joshua R. and Chouhury, Sanjiban and Mavrogiannis, Christoforos and Sadeghi, Fereshteh},
 journal={CoRR},
 volume={abs/1908.08031},
 year={2019}
}