A basic tutorial on using Imitation learning and Reinforcement learning for driving the MuSHR car
Intermediate Tutorial | Expected duration is 90 minutes
By: Sidharth Talia
Introduction
Deep learning is part of a broader family of machine learning methods based on artificial neural networks with representation learning. Learning can be supervised, semi-supervised or unsupervised. In this tutorial, we’ll see how to get started with applying imitation learning as well as reinforcement learning to the MuSHR car through the use of a modified simulator developed by the DIYRobcars community, named Donkey Simulator.
Goal
This tutorial will help you get familiar with the framework developed for creating, training and testing the neural network models in the modified driving simulator.
Prerequisites
In order to successfully complete this tutorial you will need:
- Familiarity with python
- Python version >= 3.6 (the dependency screeninfo doesn’t work well with python<3.6), pip version >= 20, setuptools >=44
- Pytorch. For installing PyTorch, follow the instructions on this link. You’ll have to select the options that match the configuration of your computer. For example, if you have a Windows computer with CUDA NOT enabled, you’d pick :
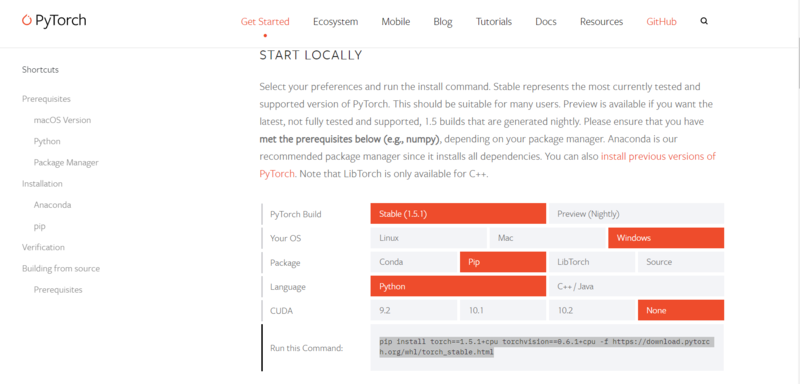
If you have CUDA enabled, you’d pick the option for the CUDA version you have installed on your computer. Copy the highlighted command and paste it in the terminal/cmd and hit enter. (use pip3 instead of pip if you have python 2.x and 3.x on the same system)
- Git installed. Refer to this ’link’ for installation instructions. Follow the instructions for the type of OS you have.
- A system with a minimum of 8 Gigabytes of RAM, preferably with the GPU enabled.
Note:
It is advised to use a GPU enabled machine for running the models, as the inference time for the models can be high when running on CPU, which may lead to control related issues when actually using the model to drive the car.
Setting up the environment
- Downloading the simulator: Download the precompiled binary for the simulator from these links: Windows, Linux, Mac OS. Extract it into the home directory (or wherever you prefer to extract it, just remember where you extract it) and rename it to “DonkeySim”. Within the extracted folder, you should see the following contents(for Linux. In windows, you’ll see a donkey_sim.exe instead and find .dll instead of .so, but the overall contents will be the same)
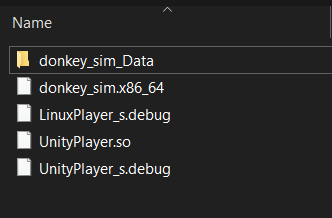
In the case of macOS, the files will have a slightly different arrangement but they’ll all be there when you download the binaries.
- Downloading other files related to MUSHR-DL: Open the terminal(Linux) or command-line interface (Windows) and navigate to the folder where the simulator files are kept.
$ cd PATH\\TO\\DonkeySim
Note:
Note that from here onwards,
$ cd DonkeySim
Refers to:
$ cd PATH\\TO\\DonkeySim
Execute these commands in the DonkeySim directory:
$ git clone https://github.com/prl-mushr/gym-donkeycar.git
$ pip3 install -e gym-donkeycar
$ git clone https://github.com/prl-mushr/MUSHR-DL.git
Dependencies: The remaining dependencies can be installed by running
$ cd MUSHR-DL
$ pip3 install -r requirements.txt
Running the examples:
Running the simulator:
Find the donkey_sim.exe or donkey_sim.x86_64 file (it will essentially be an application) within the DonkeySim directory. On Linux, you’ll have to give permission for the execution to this application. You can do this by entering the following command in the terminal:
$ cd DonkeySim
$ sudo chmod +x donkey_sim.x86_64
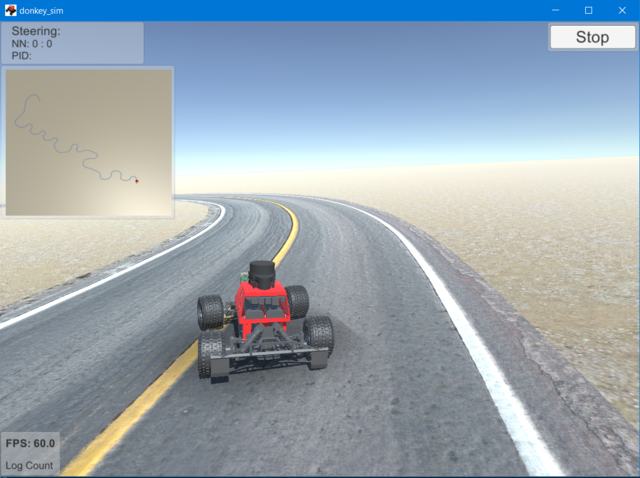
Now double click on it to start the simulator. Right now, the simulator is running in stand-alone mode. Your screen should look something like this:
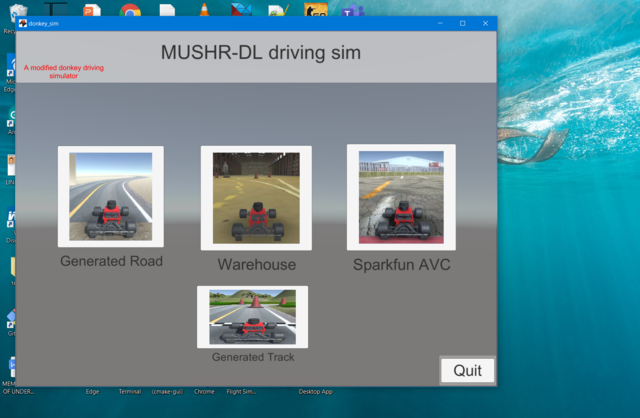
Click on the box with “Generated road” caption. You should see something like this:
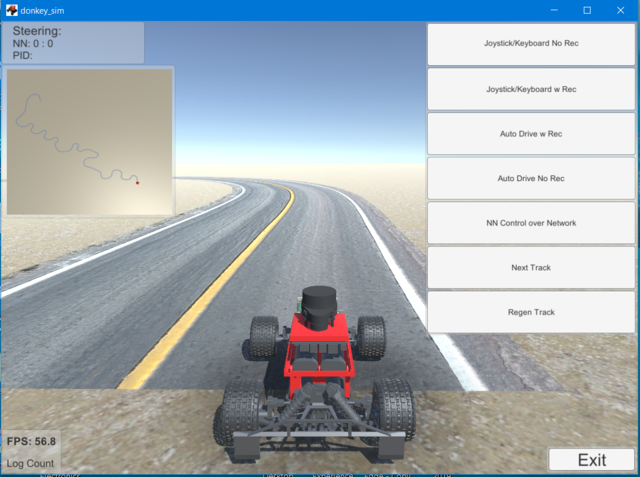
Note that each time you start the generated track, you will get a different track layout. This is useful for producing a rich dataset for training. The donkey sim by default allows you to record steering and image data. However, we won’t be using this feature.
Driving the car with the keyboard should give you a feel for the dynamics of the car. Drive till you’re content, then click on “STOP” on the top right corner. You can try out other environments or quit the simulator at this point.
Reinforcement Learning:
The reinforcement learning example is already provided by the gym-donkey car package. The aforementioned package provides an open-AI-gym interface for training and inference.
Training: a) Start the simulator by double-clicking it.
b) Execute the following commands in the terminal:
$ cd DonkeySim
$ python3 gym-donkeycar/examples/reinforcement_learning/ddqn.py
It is possible to start the simulator by passing an argument as well but it’s not the most user-friendly method, so it has been omitted for the sake of simplicity.
You can expect the car to start moving erratically and resetting to its initial position every time it hits something or crosses the lane boundary like so:
The trained model is saved as “rl_driver.h5” in the \MUSHR-DL\gym-donkeycar\examples\reinforcement_learning directory. The training can be aborted at any time by pressing “Ctrl+C”. The model is saved after each episode (an episode lasts until the car hits something or crosses the lane).
Testing: You can test your model with the following command:
$ cd DonkeySim
$ python3 gym-donkeycar/examples/reinforcement_learning/ddqn.py --test
Imitation Learning:
Imitation learning: Imitation learning involves 4 steps; data collection, post-processing, training, and testing. For collecting training data as well as for running the models, the same file “run_sim.py” needs to be run.
Collecting data: For collecting data, first, start the simulator, then, using the command line (in the same directory), execute run_sim.py. Options available for this file are:
dataset_name: A suffix that will be added to the standard dataset name. for example: MUSHR_320x240_test.npy, where “test” is the suffix
model: Type of model: image to steering, image to bezier or image to image. This does not apply when collecting data
test: Whether we’re testing the model or not. It is False by default
manual_control: How the car is driven manually. The default is to use the mouse for steering and throttle and use keyboard keys to record/ abort and change driving mode (auto or manual).
env_name: Name of the environment that you want to be loaded in. The list can be seen by typing -h after the above command
Enter the following command in the terminal/cmd after starting the simulator (don’t select the environment manually, just double click the exe file and that’s it, the python script takes care of the rest):
$ cd DonkeySim
$ python3 run_sim.py --dataset_name=testing
You will notice a similar interface as before:
However, you’ll also notice that right as the environment is loaded, your mouse gets centered on the screen. Moving the mouse up and down will increase the throttle or apply brakes (or reverse the car if it has come to a halt already). Moving the mouse left will turn the steering left and vice-versa. Small mouse movements should be sufficient to completely control both the throttle and the steering.
Once you’re confident in your driving ability with the mouse, you can start recording the data. Key bindings:
K: toggles recording (does not save the recording to the hard drive when recording is turned off)
O: aborts recording (and saves it to the hard drive in the same directory as MUSHR-DL) and shuts down the simulator. It can also shut down the simulator even if recording has not started; its essentially an abort button)
M: enables manual steering control
A: enables autonomous steering control (if neural net model exits)
The last two key bindings are not relevant for data collection, so just pay attention to the first two keys for now.
Note:
If you’re running this tutorial on python version <3.6, you may get an error related to the screeninfo package. In that case, open the file MUSHR-DL/key_check.py and remove all the lines related to screeninfo and set screen_width and screen_height to the pixel width and height of your monitor
Post-processing: The next step is to run post-processing on the collected data: post-processing involves, at minimum, shuffling of the data, and creation of the labels for each image.
Options available for this file are:
dataset_name: The output file will have the name MUSHR_320x240_shuffled_dataset_name.npy.
model: Type of model to create the dataset for (for now we’ll only consider steering).
In this tutorial, we will create a dataset for training an image-to-steering network.
$ cd DonkeySim/MUSHR-DL
$ python3 post_processing_mushr.py --dataset_name=test --model=steering
- Training: Execute the following command to begin training the steering predicting model (assuming the dataset for steering prediction has been generated in the previous step):
$ cd DonkeySim/MUSHR-DL
$ python3 pytorch_img_to_steering_train.py --dataset_name=test
the model will be saved with a preset name. The same model name is used in testing as well as the model running script, and so for the sake of the tutorial, the name should be left as is.
Testing: The following command can be used to test the model. The printed numbers are the error (or difference) between the ground truth (human driver or supervisor’s response to the input image) and the network output.
$ python3 pytorch_img_to_steering_test.py --dataset_name=test
- Driving the car using the trained model:
To use a model for driving the car (assuming that the model exists), start the simulator again by double-clicking the donkey_sim.exe/x86_64 and then run the following commands:
$ cd DonkeySim/MUSHR-DL
$ python3 run_sim.py --test=True --model=steering --env_name=MUSHR_benchmark
The environment “MUSHR_benchmark” is a simpler, fixed environment that you can use to compare the performance of different networks. the model type is set to steering as we trained a simple image to steering prediction network.
When the environment loads, you’ll notice that you can still control the car manually with the mouse. To enable the neural net steering, press “A”. You will notice that the steering will now operate on its own and will not be affected by your mouse inputs. The throttle will still be in your control and so you will have to use the mouse to apply throttle.
Implementation details:
This section provides information on how the underlying code works and how one could test their own models within this framework. The RL pipeline is fairly straightforward and the steps for it have been provided here, therefore, we can jump to the Imitation learning pipeline.
Note:
This section assumes that the reader is well versed with Python, NumPy, OpenCV, and has some understanding of pytorch (a high-level understanding is sufficient).
As stated before, the imitation learning pipeline involves 4 steps, data recording, post-processing, training and finally running the trained model on real-time data (which can be considered as “testing”). For the purposes of data recording as well as running the model, we use the same script run_sim.py, for post-processing, we use post_processing_mushr.py, and for training, we use pytorch_img_to_steering_train.py.
Simulator:
Before we get to the code part, lets first quickly consider what we get from the simulator. The simulator provides the following state information about the car:
- Position (x,y,z): (x,y,z) position of the car relative to a predefined origin (note that the car does not start at 0,0,0)
- Speed (scalar): the absolute speed of the car
- Steering and throttle values
- Hit: whether the car has hit something
- Cross-track error (CTE): distance from the centerline of the track; this is useful for training RL agents
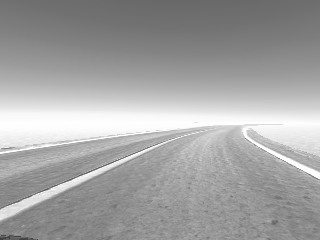
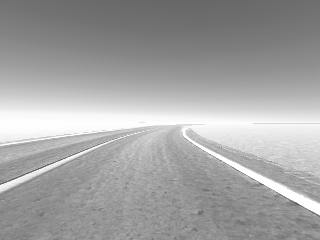
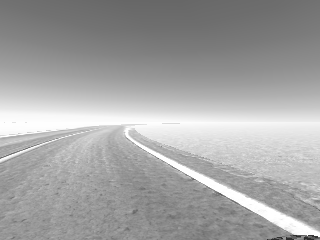
- Camera image(s): 3 images of size 320x320 with a horizontal field of view (fov) of 87 degrees. There are 3 cameras on the car, one camera pointing straight ahead, and the other two pointing towards the left and right at an angle of 15 degrees. The center camera image is RGB, while the other two are greyscale (but still have 3 color dimensions because the images are transferred in a png format, therefore necessitating the use of 3 color dimensions). To mimic the real camera characteristics on the MUSHR car, we need 320x240 pixel images (the actual camera has 87-degree horizontal fov and a 58-degree vertical fov, the simulator does not allow that, so this is a workaround to get the same fov as the real camera). After cropping the top and bottom 40 pixels from these images, you’d get something like this (the images are from left to right in that order):
Main script:
The main script “run_sim.py” performs the following tasks:
- Selects the desired environment in the simulator,
- Communicates with the simulator (in a client-server manner, where the simulator is the server)
- Collects and saves training data
- Runs the Imitation learning models
- Recording analysis data (this is useful for comparing different models)
The main script is actually a modified version of this script from the donkey simulator source code.
The interface script:
The main script (run_sim.py) defines a class SimpleClient, which derives from the SDClient class. As far as we are concerned, the object of this class performs the job of getting and sending data using the functions on_msg_recv and send_controls respectively. We don’t have to call these functions to pass or get the values. They are called automatically and asynchronously, therefore we merely need to create class members that can be used within these functions to set or get the required data.
The car-specific script:
In order to avoid chaos, we create a separate module called CAR.py which defines a class called driver, which contains all the variables related to the car itself; the state (position, speed, steering, throttle, image) as well as other information which may be useful such as the wheelbase of the car and status flags for whether the data is being recorded or not.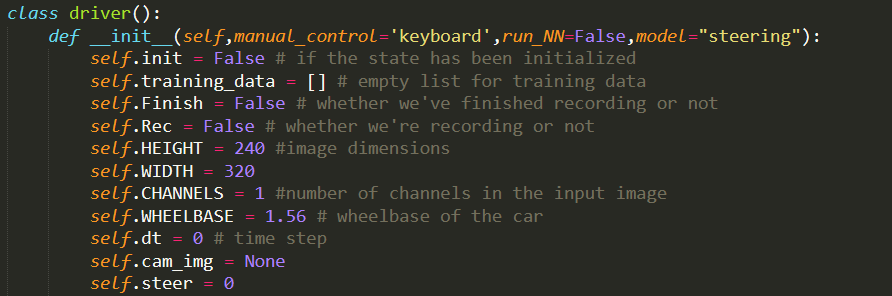
In the SimpleClient class inside run_sim.py, we create an object of the “driver” class and call the update_state function in the on_msg_recv function. This function is the core of the driver class, as it updates the state of the car and records the data. Note that it records the state of the car along with all the 3 camera images (grayscale). The data is appended to a list, which is then saved as NumPy array by the main script (run_sim.py)
Within the same script, in the init function you will find variables for input and the Neural net being defined. These are objects that are responsible for updating the control commands. The main functions of these objects are run in a separate thread to allow asynchronous operation.
Command/Control scripts:
Manual control:
The control inputs are captured by the object of class keyboard_input. This class further makes use of the key_check module which further uses pynput library for getting the keyboard strokes and mouse inputs. The job of this module is to act as a middle-man so that the key bindings may be modified in the future.
Autonomous control
The imitation learning model (or any autonomous approach based model) is run using the object of class model_runner. The update_model_input is used for getting the data, while the run_model is used for processing the input asynchronously.
The overall structure of all these modules looks like this: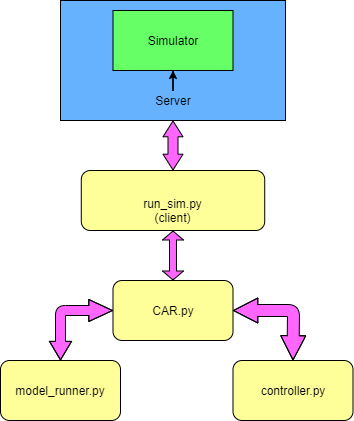
Going through these files should tell you how you could add your own methods (ideally, you should add your autonomous control code in the model_runner file).
The model:
The file pytorch_model.py provides an example model for controlling the steering angle with the input as an image. Feel free to play around with the architecture of the model. If you change the output type or dimensions, you’ll have to do the same with the dataset as well and write your own code block for converting your output to a steering angle. The script contains 2 other models as examples to show how the model could be modified to output
- Parameters for a bezier curve trajectory that the car has to follow
- An image which displays the trajectory that the car has to follow
The model is imported during training to the training script. This script is essentially a repository for all the models you create, which makes making complex models convenient as you could borrow and swap code blocks from other existing models fairly easily.
The post-processing script:
The post_processing_mushr.py file is used for performing any and all post-processing on the data. We’ll consider the post-processing approach for the steering data in the create_steering_data function. The variable ‘N’ is for controlling the frames that you want to exclude; for instance, if the recording was stopped due to some glitch or a driver error, the driver error would also be recorded in the last 1 second (last 15 frames). The model we have here expects a 320x240x1 image as input and produces a 2x1 output. The output essentially represents how much the model thinks the car should go left and how much it should go right. If both numbers are 0.5 and 0.5, the net steering angle would be 0.
The purpose of the function is to convert the single steering angle value between -1 and 1 to 2 variables representing left or right. You could design your own custom functions for a different kind of output (for example, a 30x1 array where each entry represents a steering angle between +/-15 degrees). For the camera images looking 15 degrees away from the center, add or remove 10 degrees of steering angle before converting to a 2x1 format. Finally, shuffle the data and then save it.
The same file includes 2 other functions for utilizing a different approach towards imitation learning. The first is to predict the trajectory of the car as a bezier curve up to some distance into the future. The other is to predict the trajectory of the car in the image plane itself and then make the car follow that trajectory. These other functions should show you how you could create datasets that require action-sequence preservation (with shuffling). The shuffling step is common across all approaches.
The training script:
The pytorch_img_to_steer_train.py shows how the image-to-steering model can be trained. Here we assume that the model has already been defined and accepts a 320x240x1 image (or Tensor) and spits out a 2x1 output. The pytorch_high_level.py module provides a high-level interface for training any model.
If you create a model with different outputs, like the Bezier or image-to-image model, you will have to write your own code for converting the model’s output into control commands. The scripts mentioned here can be used as a template for you to make your own scripts.