Get your car started and teleop running
Beginner Tutorial | Expected duration is 15 - 30 minutes
By: Matt Schmittle
Introduction
This tutorial will get your car up and running teleoperation.
Goal
To get you driving your car around in teleop.
Requirements
- Complete the hardware setup with your car
- Complete the quickstart tutorial. (Required for rviz)
- A desktop/laptop computer that can ssh into the car.
- Ethernet Cable
- Monitor (Wi-Fi Setup Only)
- HDMI/Display Cable (Wi-Fi Setup Only)
- USB Keyboard/Mouse (Wi-Fi Setup Only)
Booting Up
Make sure your sd card is plugged into your Jetson Nano and flush, this should be done from the hardware tutorial. If you have an AC to 5V power adapter you can plug that into the barrel connector on the USB port side of the Jetson Nano. If not, place a battery in the right side of the car and plug the connector into the matching connector going into the top half of the car. Plug in the right angled barrel connector into the Jetson Nano. The green light on the right side should turn on. The correct configuration is shown below.
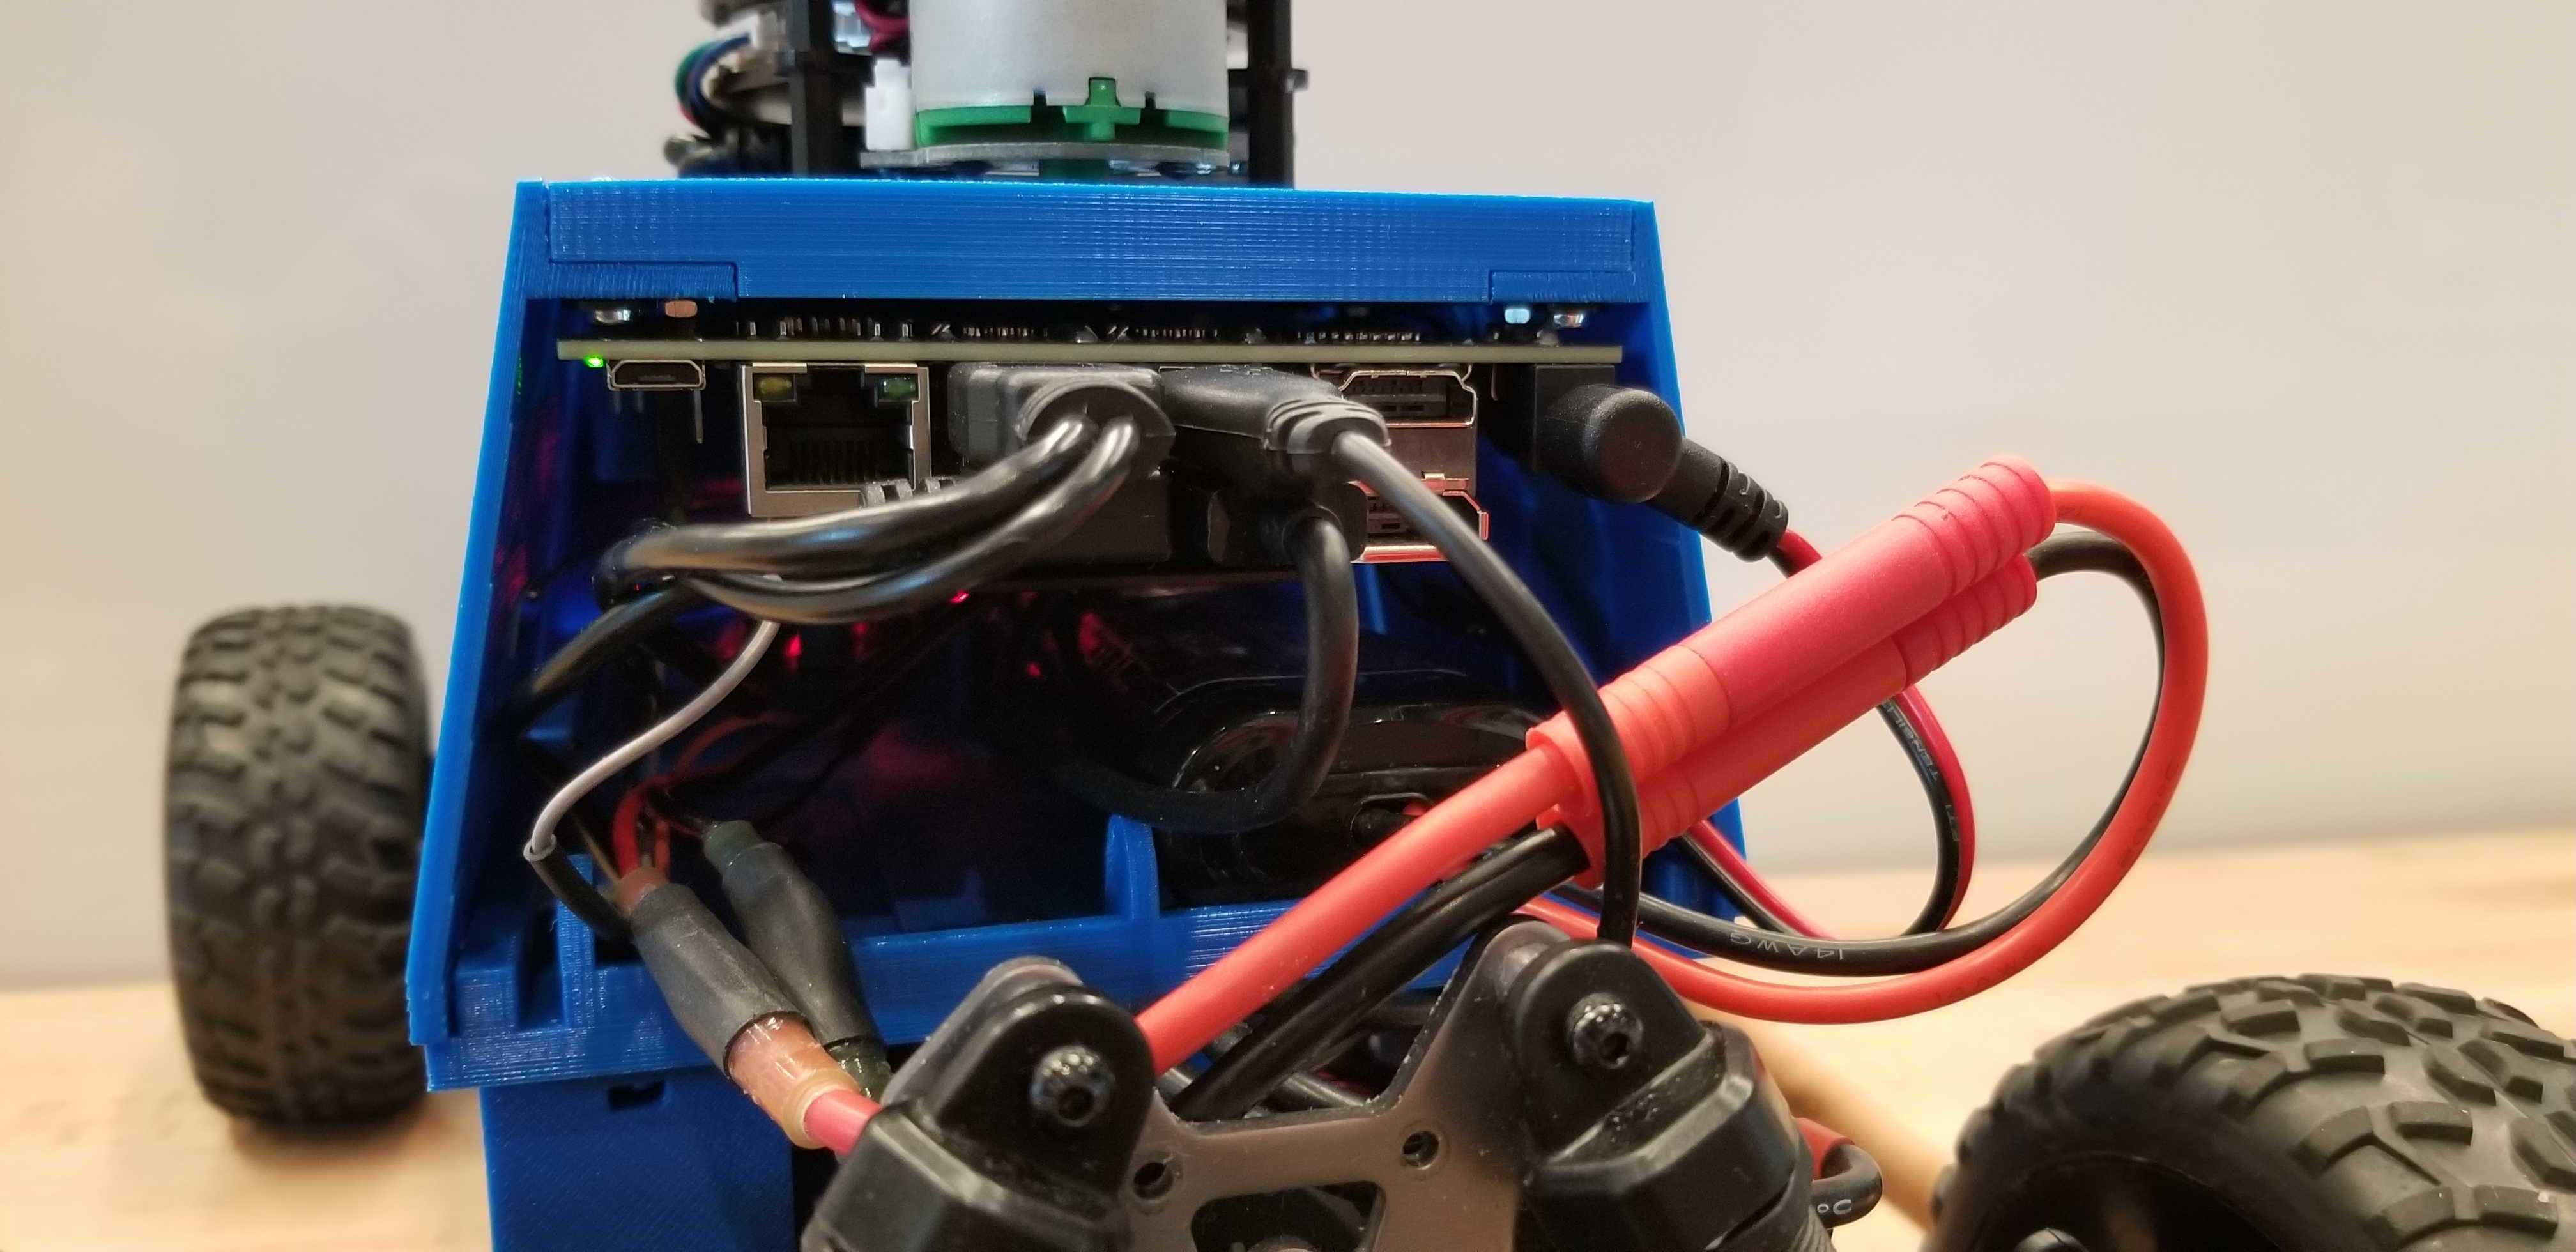
Everything plugged in correctly. Notice the barrel connector in the top right, the battery in the right slot, and the green light in the top left.
By default your car creates it on network called ROBOT AP. On your separate computer, connect to this network and ssh into your car.
$ ssh robot@10.42.0.1 -XPassword: prl_robot
If you experience any errors, make sure you are connected to ROBOT AP and you typed the above properly.
Configure User & Hostname
Your connected! So let’s change the password and hostname. This section is all done on the robot side. First let’s change the password.
$ passwd Enter prl_robot as the current password and then type your new password with the prompts. Now let’s configure the hostname, it is currently set to goose. Open the hostname file.
$ sudo gedit /etc/hostname You will be prompted to enter the password. Change goose to whatever you want to use and save & exit. Similarly open the /etc/hosts file.
$ sudo gedit /etc/hostsAnd replace any goose with your new hostname. Save & exit. Reboot the car, to see the effect. Note: you will have to ssh in again.
$ sudo rebootUpdate Repos
Because mushr is always updating, you may have outdated code on your image. To fix this just enter ~/catkin_ws/src/mushr and pull via vcstool. For this to work, you need to give your car access to the internet. The easiest way to do this is by plugging an ethernet cable from an ethernet port on your home router to the car. If you don’t have an ethernet cable, you can plug in a monitor, mouse, and keyboard into the Jetson Nano and connect the car to a wifi network.
$ cd ~/catkin_ws/src/mushr && vcs pull -nNote: If you edited mushr source code, this will be overwritten. You can instead pull repos individually
Configure Visualization
Visualization is important for seeing what your car is thinking such as which trajectory it will follow or its current position in the map. On your laptop with rviz make sure to set your default.rviz to ours found in mushr/mushr_utils/rviz/default.rviz.
$ cp ~/catkin_ws/src/mushr/mushr_utils/rviz/default.rviz ~/.rviz/Set the ROS_IP to your IP. Your IP can be found in a variety of ways: Linux, Mac, Windows.
Set ROS_IP with:
$ export ROS_IP=YOUR-IPSet the ROS_MASTER_URI to the IP of the car.
$ export ROS_MASTER_URI=http://10.42.0.1:11311You are configured! Wait till teleop is running to launch rviz on your laptop.
$ rvizIf you get errors make sure the following are correct:
- Teleop is running
- Your laptop is connnected properlyThis should output a bunch of topics. If not, check your
$ rostopic listROS_MASTER_URIandROS_IPto ensure they are correct.
Launch Teleop the Easy Way
To do this you need a push button on the front of the car. This method turns on teleop whenever you hold the button on teleop. By default it is disabled. The following will enable it. First, turn on the car by plugging a battery into the top connector. Then connect to the ROBOT_AP WIFI network. Then ssh into the car.
$ ssh robot@10.42.0.1 -XNext, we need to uncomment the startup command for the button teleop. Open /etc/rc.local and uncomment line 9.
$ sudo vim /etc/rc.localUse the default password. Now you can turnoff the car by running the following and unplugging the batterie.
$ sudo shutdown nowTurn on the car and vesc by plugging their batteries in. Hold down the front button as the car is starting. After a minute or so the lidar should start spinning indicating teleop is running.
Launch Teleop the Hard Way
This is better for debugging your code. Turn on the car and vesc by plugging their batteries in. This will involve multiple windows. You can either make a bunch of windows on your laptop and ssh from each of them or use tmux from one window. Tmux is installed on the car image. First, ssh into the car. Then start roscore.
$ roscoreIn a new window, ssh into the car.
$ ssh robot@10.42.0.1 -XAnd launch teleop.
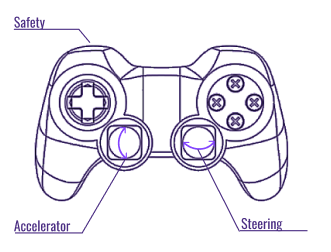
$ roslaunch mushr_base teleop.launchYou should see the lidar spinning and be able to steer with the controller. While holding down the left bumper, use the left joystick to throttle, and the right joystick to turn. See diagram below.
Setup Wi-Fi (Optional)
If you want to install additional software on the car, or be able to use the internet on your laptop while connected to the car then you will want to set the car up with a static IP instead of it’s own network. To do this, you will need to plug a monitor, keyboard, and mouse into the car. The keyboard/mouse can go in any of the USB ports, Wi-Fi setup does not require the sensors to be connected.
Once hooked up, you should see the login screen or the desktop. Login using your new password. Then use the mouse to click on the Wi-Fi icon in the top right. Disconnect from ROBOT_AP. Then open the connection manager.
$ sudo nm-connection-editorClick on Robot AP then the General Tab. Uncheck Automatically connect to this network when it is available. Exit.
Open /etc/modprobe.d/bcmdhd.conf with sudo privileges.
$ sudo gedit /etc/modprobe.d/bcmdhd.confIf the second line (options bcmdhd op_mode=2) is not commented out then comment it out (#options bcmdhd op_mode=2), save the file and reboot the Nano. Otherwise, just close the file.
Connect to the network that the robot should have a static IP on. Do this by clicking on the opposing arrows symbol in the top right hand corner of the Ubuntu GUI and inspecting the Wi-Fi network list. If your robot is already connected to the correct network, then proceed to the next step. If it is already connected but to the wrong network, click Disconnect and then allow the Wi-Fi network list to refresh. Once the desired network appears in the Wi-Fi network list, click on it to connect. If the network does not appear in the Wi-Fi list, try using the Connect to Hidden Wi-Fi Network... option.
Open the network connection editor again.
Highlight the connection that corresponds to the network the robot should be connected to and click Edit.... The connection should have the same name as the network if the robot has never connected to this network before. If the robot has connected to this network before, it might have the same name but post-fixed with a number. If this is the case, choose the one with the highest post-fixed number.
Click on the General tab and check that Automatically connect to this network when it is available and All users may connect to thisnetwork are enabled.
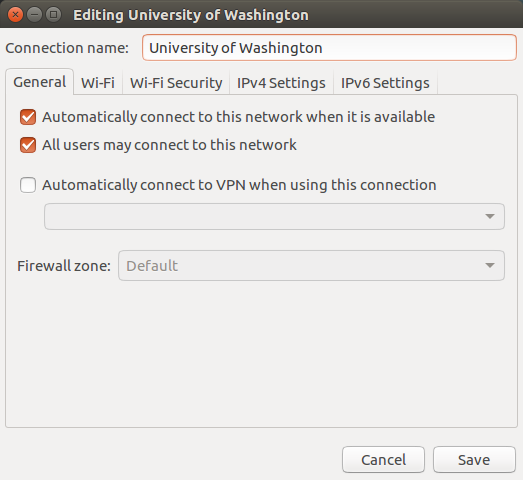
General tab with auto connect set
Click on the Wi-Fi tab. Make sure that the SSID: field is set to be the name of the network that the robot will have a static IP on. For example, it could be University of Washington. Make sure that the Mode: dropdown is set to Client. In the BSSID: dropdown, choose the last option. In the Device: dropdown, choose the last option.
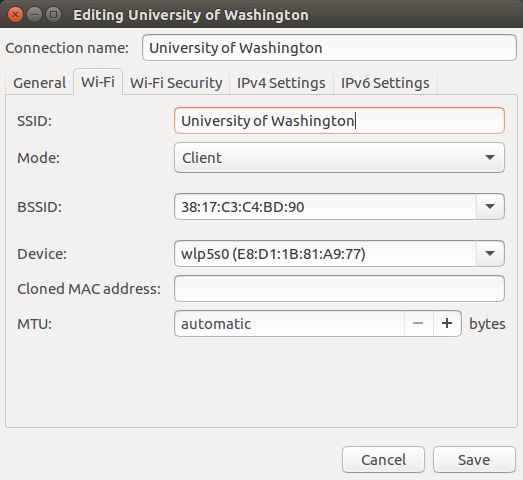
Wi-Fi tab with BSSID and SSID set
Click on the Wi-Fi Security tab. Check that the Security: dropdown is set to None.
Click on the IPv4 Settings tab. Set the following fields:
- Method: dropdown to be Manual.
- Click Add. Under Address, enter:
- The Static IP: for example
172.16.77.Z. - Netmask: for example
255.255.255.0. - Gateway: for example
172.16.77.100.Zis usually the robot number on the car, but it’s up to you!
- The Static IP: for example
- DNS servers: field, enter
8.8.8.8.
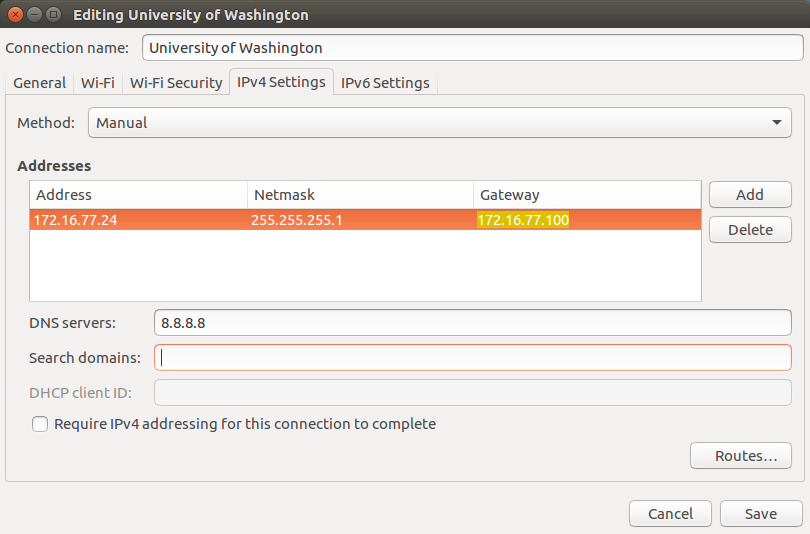
IPv4 tab with an example IP setup
Click the Save button and close the connection editor.
Edit /home/robot/.bashrc editing the line that sets the ROS_IP (near end of file). Alter this line so that the ROS_IP is set to the static ip, for example 172.16.77.Z.
$ gedit ~/.bashrcAlternatively if you know the network interface, you can use the command (should be wlan0 interface on the Jetson):
export ROS_IP=$(ifconfig wlan0 | awk /inet\ /'{print $2}')Reboot the Nano.
After the Jetson reboots, verify that the robot has obtained the expected static ip.
$ ifconfigLogging In
Once the Nano has fully booted, it will connect to the existing network at the specified static ip. You should then be able to ssh into it with the static IP you set earlier.
$ ssh robot@172.16.77.Z`Next Steps
To learn about programming the car continue to the Intro to ROS Tutorial