Create custom maps with your car
By: Madison Doerr and Markus Schiffer
Introduction
The MuSHR car uses a map of its environment to localize itself. We can create custom 2D maps for our cars by using gmapping and our car’s laser scanner to survey the area to be mapped.
Goal
Create a custom map of an area by driving the car to survey the surroundings.
Requirements
- Complete the quickstart tutorial
- Complete the first steps tutorial
- A desktop/laptop that can ssh into the car
Ssh into the car
Boot up the car and connect the controller.
Ssh into the car on your computer, using the following command while connected to the ROBOT_AP network.
$ ssh robot@10.42.0.1 -X
Or, if you set up Wifi connect in the first steps tutorial, use the following command while connected to the same wifi network as your robot. Replace the IP listed below with the IP of your robot.
$ ssh robot@172.16.77.37 -X
Update/Install gmapping
In a terminal sshed into the car using the above steps, make sure gmapping is installed.
If you installed ros-kinetic in the quickstart tutorial:
$ sudo apt install ros-kinetic-gmapping
If you installed ros-melodic in the quickstart tutorial:
$ sudo apt install ros-melodic-gmapping
Start teleop and gmapping
Once you have sshed into the car, start teleop (on the car) to start the laser scanner and control the car.
$ roslaunch mushr_base teleop.launch
Verify that the controller is working and you can move the car. If not, try reconnecting the controller and/or restarting teleop.
In a separate terminal sshed into the robot, using the above process, set ROS_IP to the IP of your robot, then start slam (also on the robot). Slam will take the data gathered from the laser scanner started by teleop and transform that into a 2D map.
$ export ROS_IP=CAR-IP
$ roslaunch mushr_base slam.launch
Start rviz to visualize the map building
In a terminal on your computer (not ssh-ed into the robot), set ROS_IP to your computer’s IP and ROS_MASTER_URI to the IP of the car, and then start rviz.
$ export ROS_IP=COMPUTER-IP
$ export ROS_MASTER_URI=http://ROBOT_IP:11311
$ rviz
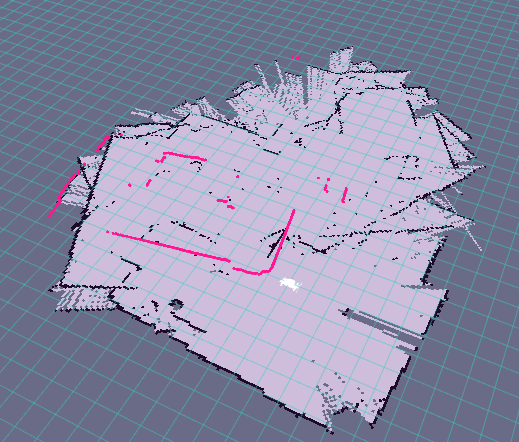
Most likely, you will not see the map your car is creating. In order to see it, make sure the /car/map topic is added to the left sidebar (different from the /map/ topic!). If it is not, you will need to add it manually. Next, set the Fixed Frame value in the Displays > Global Options menu in rviz to /car/map/ instead of /map/. Now, the car should be postioned in the map (see screenshot below). The map will dynamically update and refine as the laser scanner gathers new data.
Survey the surroundings
Now that we have started mapping, we need to survey the area! Use the controller to drive the car very slowly around the area you want to survey, pausing periodically to allow the laser scanner to gather data. You should be able to see the map in rviz updating as you drive. Since the map frame does not exist in rviz, your car will not appear to move in its environment.
Save the map
When you’re satisfied with the map in rviz, you can save it to your computer using the following steps.
In a local terminal, ensure ROS_IP is set to your computer’s IP and ROS_MASTER_URI is set to the IP of the car. Then, in that terminal, run map_saver using the following command, replacing map_name with the desired name of the map.
$ export ROS_IP=COMPUTER-IP
$ export ROS_MASTER_URI=http://ROBOT_IP:11311
$ rosrun map_server map_saver -f map_name map:=/car/map
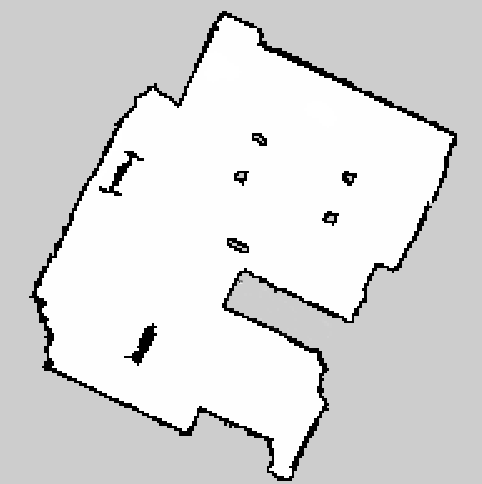
This should create a .pgm file with the map and a .yaml file with the map metadata.
Using the map
On the sim
To load your new map into the simulator, move both files to ~/catkin_ws/src/mushr/mushr_base/mushr_base/mushr_base/maps/, replacing map_name with the name of your map.
$ mv map_name.pgm ~/catkin_ws/src/mushr/mushr_base/mushr_base/mushr_base/maps/
$ mv map_name.yaml ~/catkin_ws/src/mushr/mushr_base/mushr_base/mushr_base/maps/
Then, edit ~/catkin_ws/src/mushr/mushr_base/mushr_base/mushr_base/launch/includes/map_server.launch to set the map to the name of the .yaml file.
$ nano ~/catkin_ws/src/mushr/mushr_base/mushr_base/mushr_base/launch/includes/map_server.launch
It should look like the following, replacing map_name with the name of your map.
| |
Now, launch the sim to use your new map!
$ roslaunch mushr_sim teleop.launch
In a new terminal, run rviz.
$ rviz
Your new map and the car should appear in the sim! If you don’t see the map, make sure you are subscribed to the /map topic in the left sidebar. The map might not be in the center of the grid, and you may have to zoom out to see it.
On the car
To get the map from your computer to the robot, we need to use scp, replacing map_name with the name of your map and ROBOT_IP with the IP of your robot. From your computer, run the following from where you saved your maps:
$ scp map_name.pgm robot@ROBOT_IP:~/catkin_ws/src/mushr/mushr_base/mushr_base/mushr_base/maps/
$ scp map_name.yaml robot@ROBOT_IP:~/catkin_ws/src/mushr/mushr_base/mushr_base/mushr_base/maps/
Then, edit ~/catkin_ws/src/mushr/mushr_base/mushr_base/mushr_base/launch/includes/map_server.launch on the robot to set the map to the name of the .yaml file.
$ nano ~/catkin_ws/src/mushr/mushr_base/mushr_base/mushr_base/launch/includes/map_server.launch
It should look like the following, replacing map_name with the name of your map.
| |
Now, start teleop on the robot:
$ roslaunch mushr_base teleop.launch
And on your computer, set the IPs and start rviz to see the map!
$ export ROS_IP=COMPUTER-IP
$ export ROS_MASTER_URI=http://ROBOT_IP:11311
$ rviz
The map should appear, and you can move your robot into the map using Set 2D Pos Estimate.
Touching up the map
The map may have some stray pixels or jagged lines. To touch this up, we recommend using gimp to edit the .pgm file.
When doing this, use solid black (hex: #000000) pixels for edges, solid white (hex: #FEFEFE) areas for areas valid for the car, and solid gray areas (hex: #CDCDCD) for invalid space for the car.