Get the MuSHR Sim working on your computer!
Beginner Tutorial | Expected duration is 30 minutes
By: Madison Doerr
Introduction
Learn how to simulate the MuSHR Car with Foxglove visualizations.
Requirements
- A MacOS or Linux machine
Installing Docker
First, install Docker and Docker Compose for your machine. The Docker version should be 20+, and Docker Compose version should be 1.29+. Ensure that Docker is running.
If on Linux, follow the post install steps to make sure you can run Docker without root privileges.
Installing MuSHR Docker Container
Make catkin_ws where all the code will be.
$ mkdir -p catkin_ws/src
$ cd catkin_ws/src
Clone the MuSHR repository
$ git clone --branch noetic https://github.com/prl-mushr/mushr.git
Run the installation script. It will prompt you with two questions. For running the MuSHR simulator, the answers should be no, no. This will install a series of necessary packages, and create a script mushr_noetic in /usr/local/bin which initializes a docker container with all of the mushr configs installed. Note it attaches the catkin_ws volume so you can edit code outside or inside the docker container. Other files made inside the docker container will not persist unless you commit (see FAQ).
Please note that if you do opt to build from scratch (not recommended, asked by the second question), build times can take 1-2 hours (maybe less) depending on your system. Therefore we strongly recommend not building from scratch unless you absolutely need to.
$ ./mushr/mushr_utils/install/mushr_install.bash
Close the terminal and open a new one. Then run
$ mushr_noetic  # any OS, and MacOS unless building the docker image from scratch the fist time
$ # OR
$ mushr_noetic build  # if and only if building from scratch on MacOS, the first time
This should start up the Docker container. (The first time running this command will take some time to download the Docker image.) If the prefix switches to root, the installation was successful. If not, please check the “Troubleshooting” section at the end of the tutorial. Note that even if running on MacOS, you will only need to run mushr_noetic, without the build argument in the future.
In the same terminal (within the Docker container), build the MuSHR software stack.
$ cd catkin_ws && catkin build
$ cd ~
$ source .bashrc
Downloading Foxglove Studio
Since we can run the MuSHR stack now, we can use Foxglove Studio to visualize our robot and map.
First, download Foxglove Studio. Foxglove is still in development and has many features that are added frequently, so make sure to download the most recent version, or update it if you already have it downloaded.
Open Foxglove Studio, and click the “Layouts” button on the left panel (second from top) and then click
Import layout button pictured below.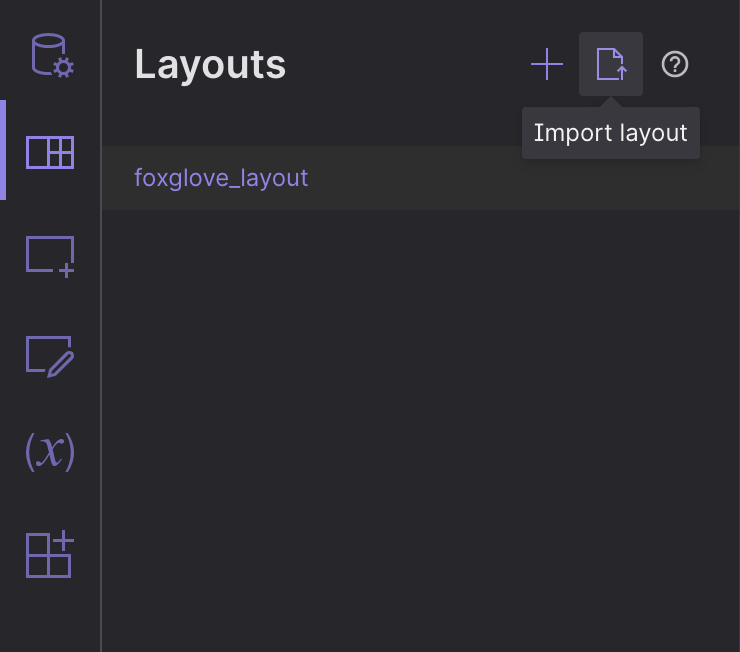
Import the preset layout from:
mushr/mushr_utils/foxglove/foxglove_layout.json
Next, click the “Extensions” button on the left panel (bottom) and then find the extension called “mushr”. The author is uwprl. Press install.
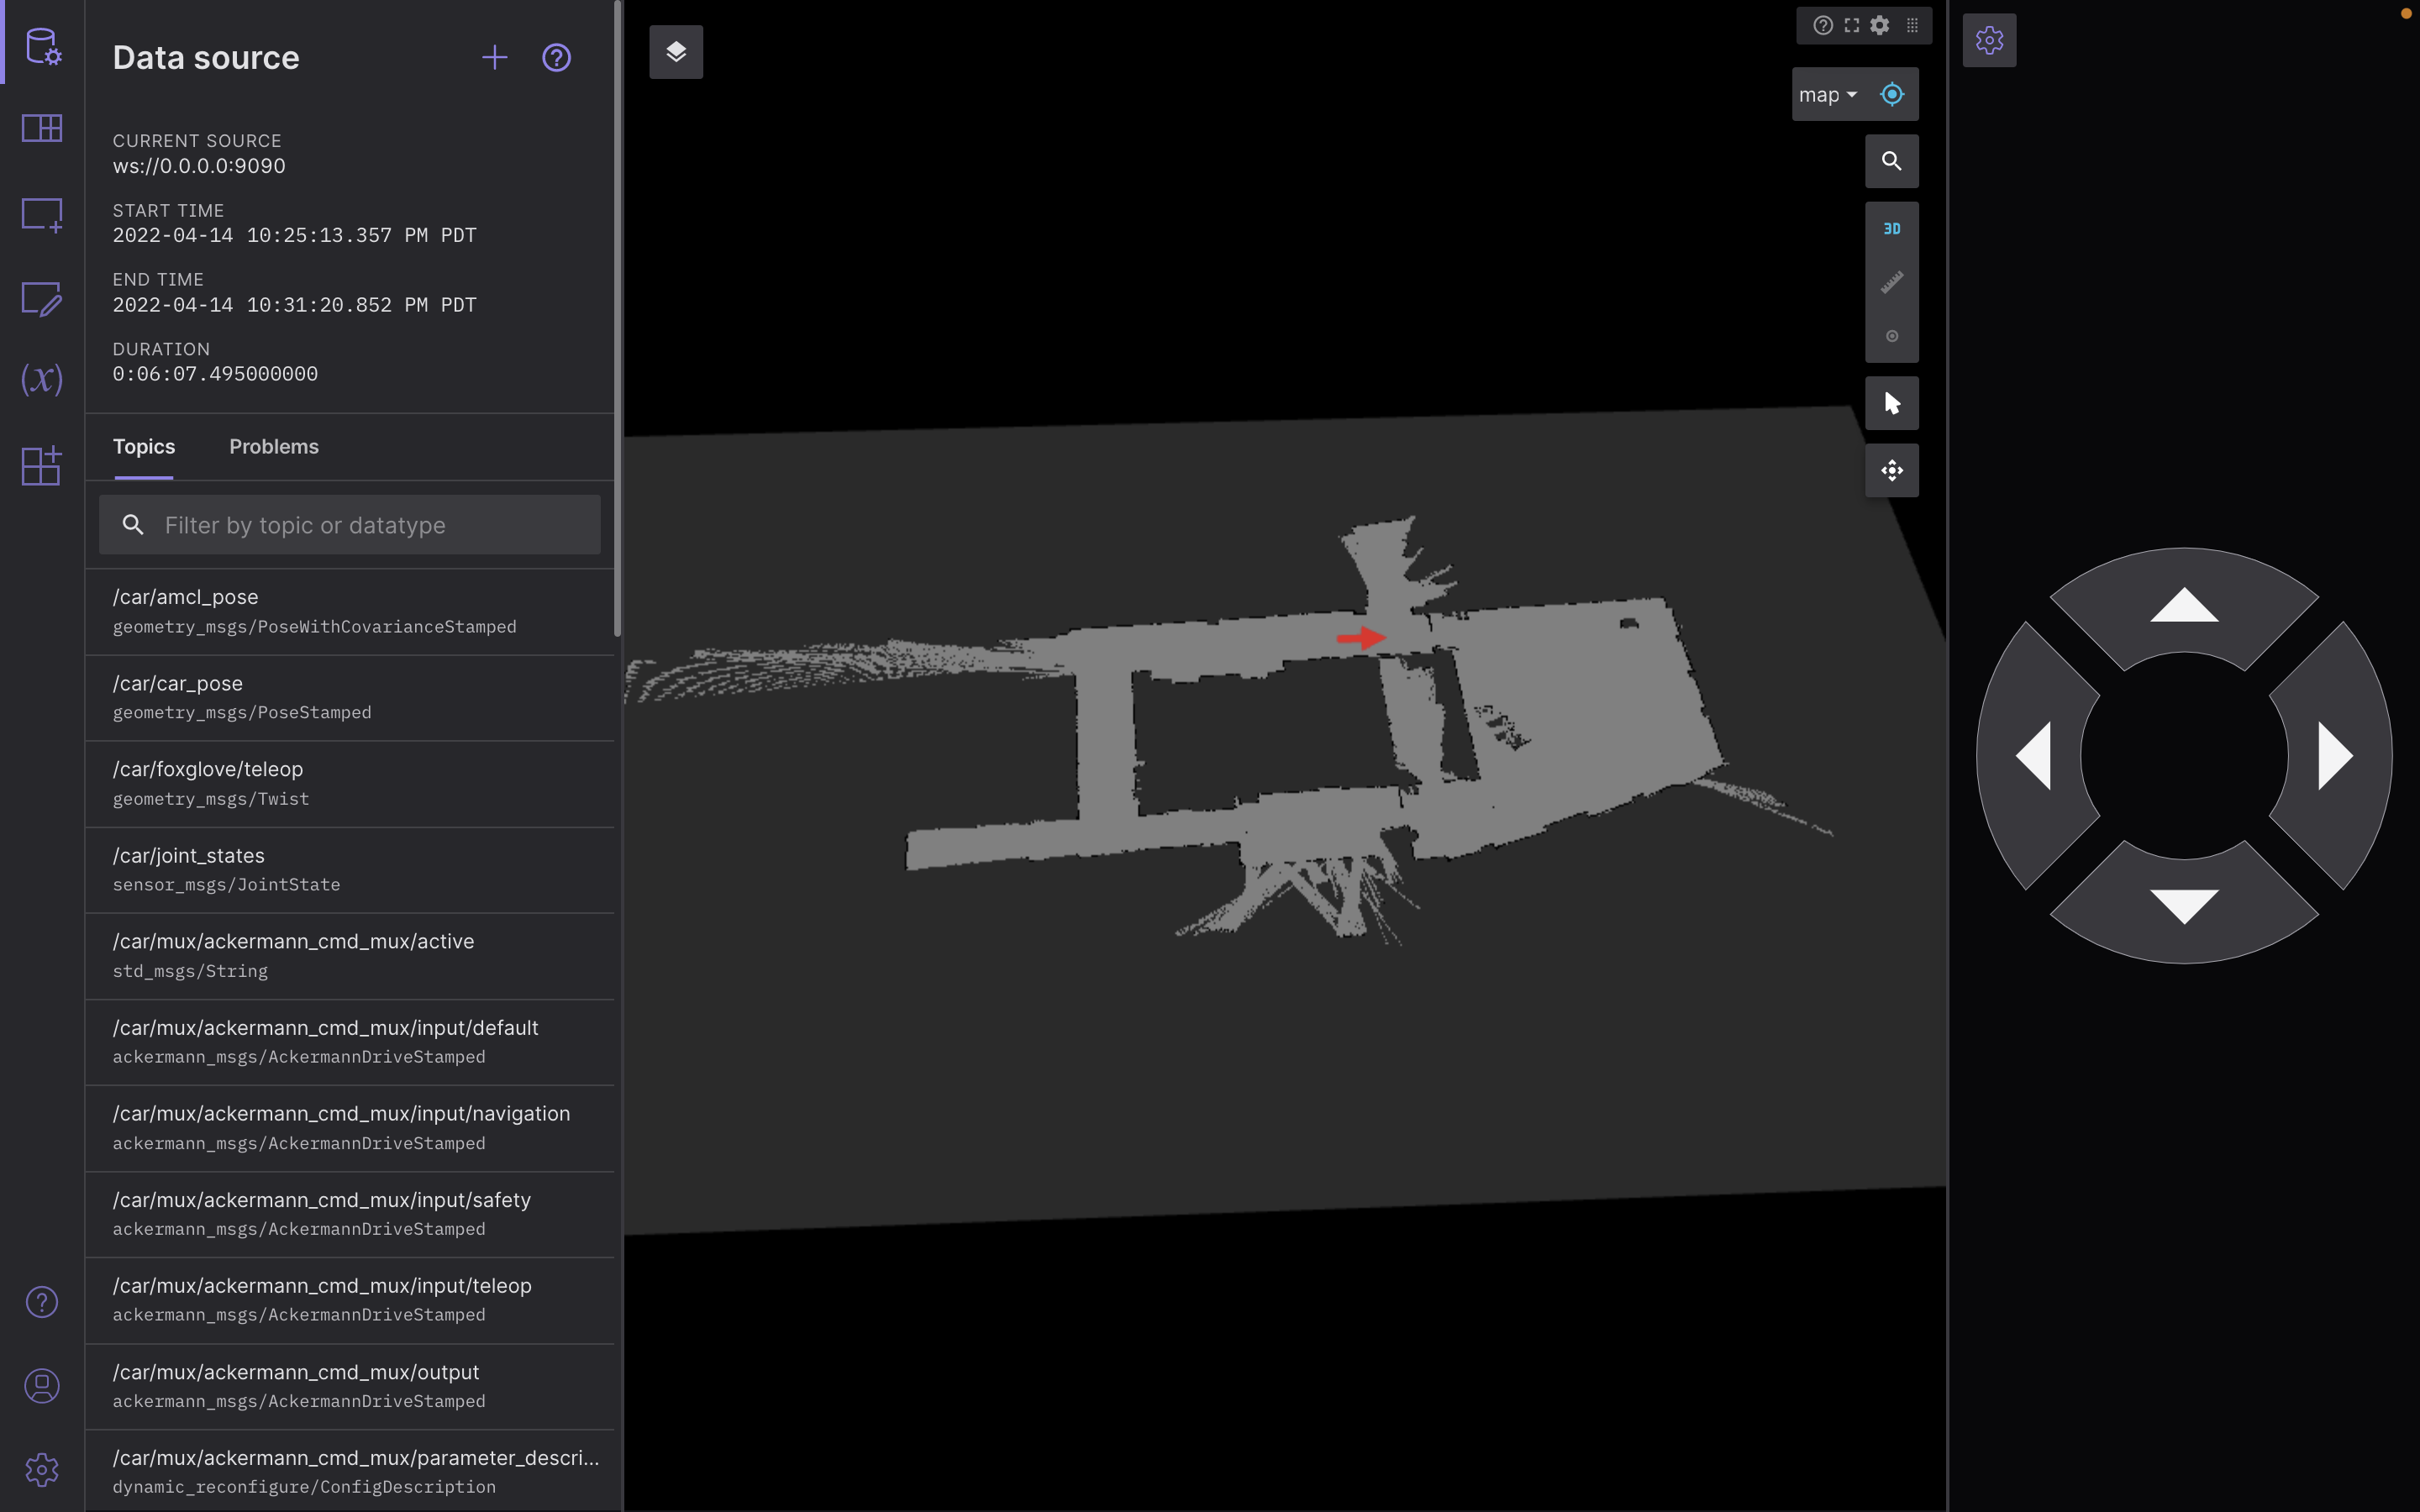
After both of the above steps, three panels should appear after selecting this layout, as pictured below. The left panel is for the data source, the central panel is for the map, and the right panel is for teleop driving.
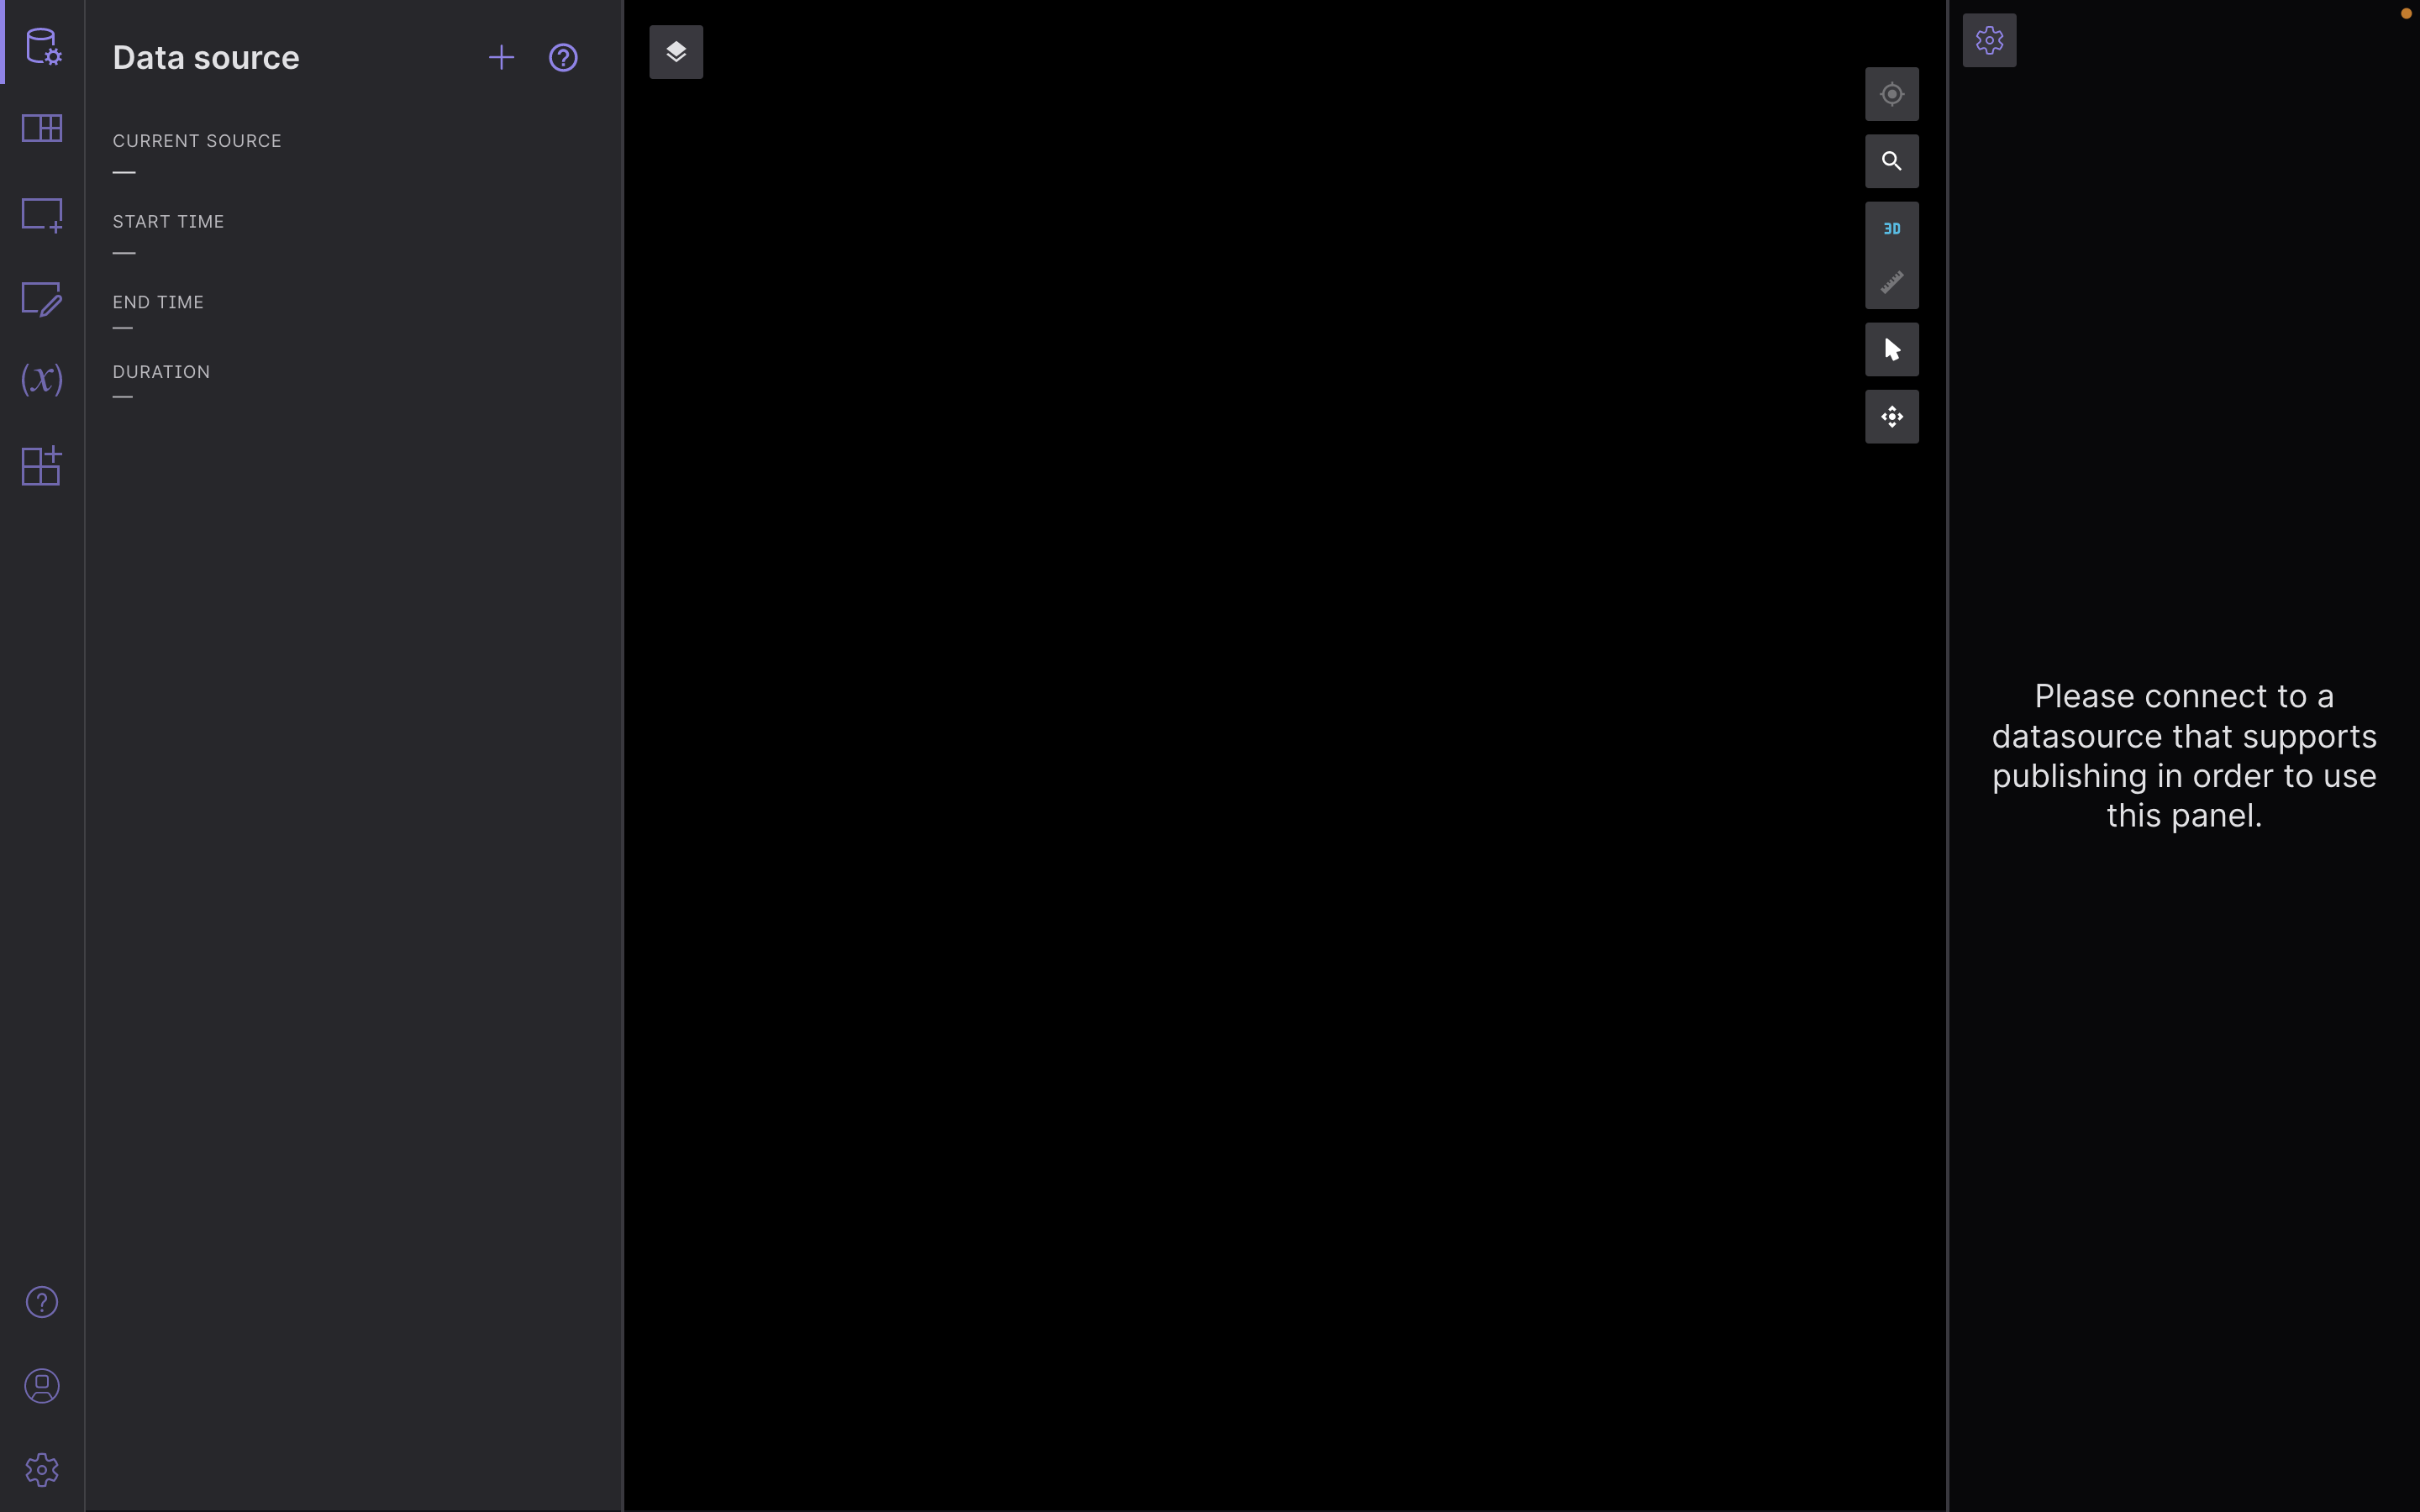
The layout can be edited with the Add panel button on the left sidebar if desired.
Connecting to Data With Foxglove Studio
Now that Foxglove is set up, we can connect the visualization to our Docker container ROS setup. Start the Docker container:
$ mushr_noetic
Once the root prompt appears, source ~/.bashrc. Note that this does not occur automatically in the Docker container.
$ source ~/.bashrc
In the same terminal, start up the simulator with the command:
$ roslaunch mushr_sim teleop.launch
After starting up, the simulator should print out a line similar to
Rosbridge WebSocket server started at ws://0.0.0.0:9090
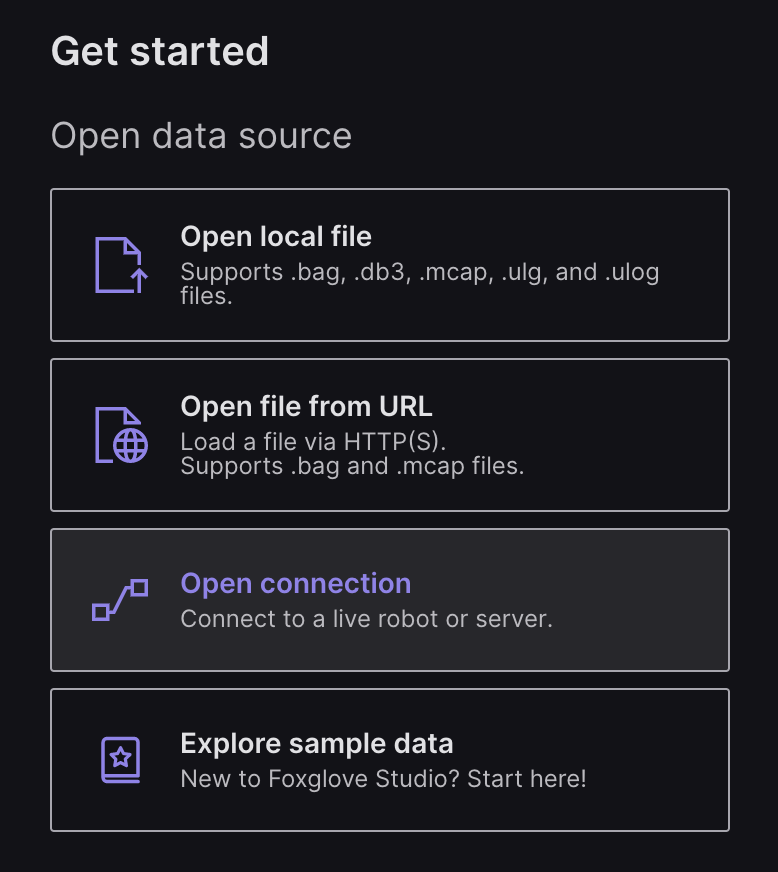
In Foxglove, click the top button in the sidebar, labeled Data source. Then select the Plus button in the left panel. This should open up an interface to connect to data.
Click the Open Connection button. Select Rosbridge (ROS 1 & ROS 2) as shown below.
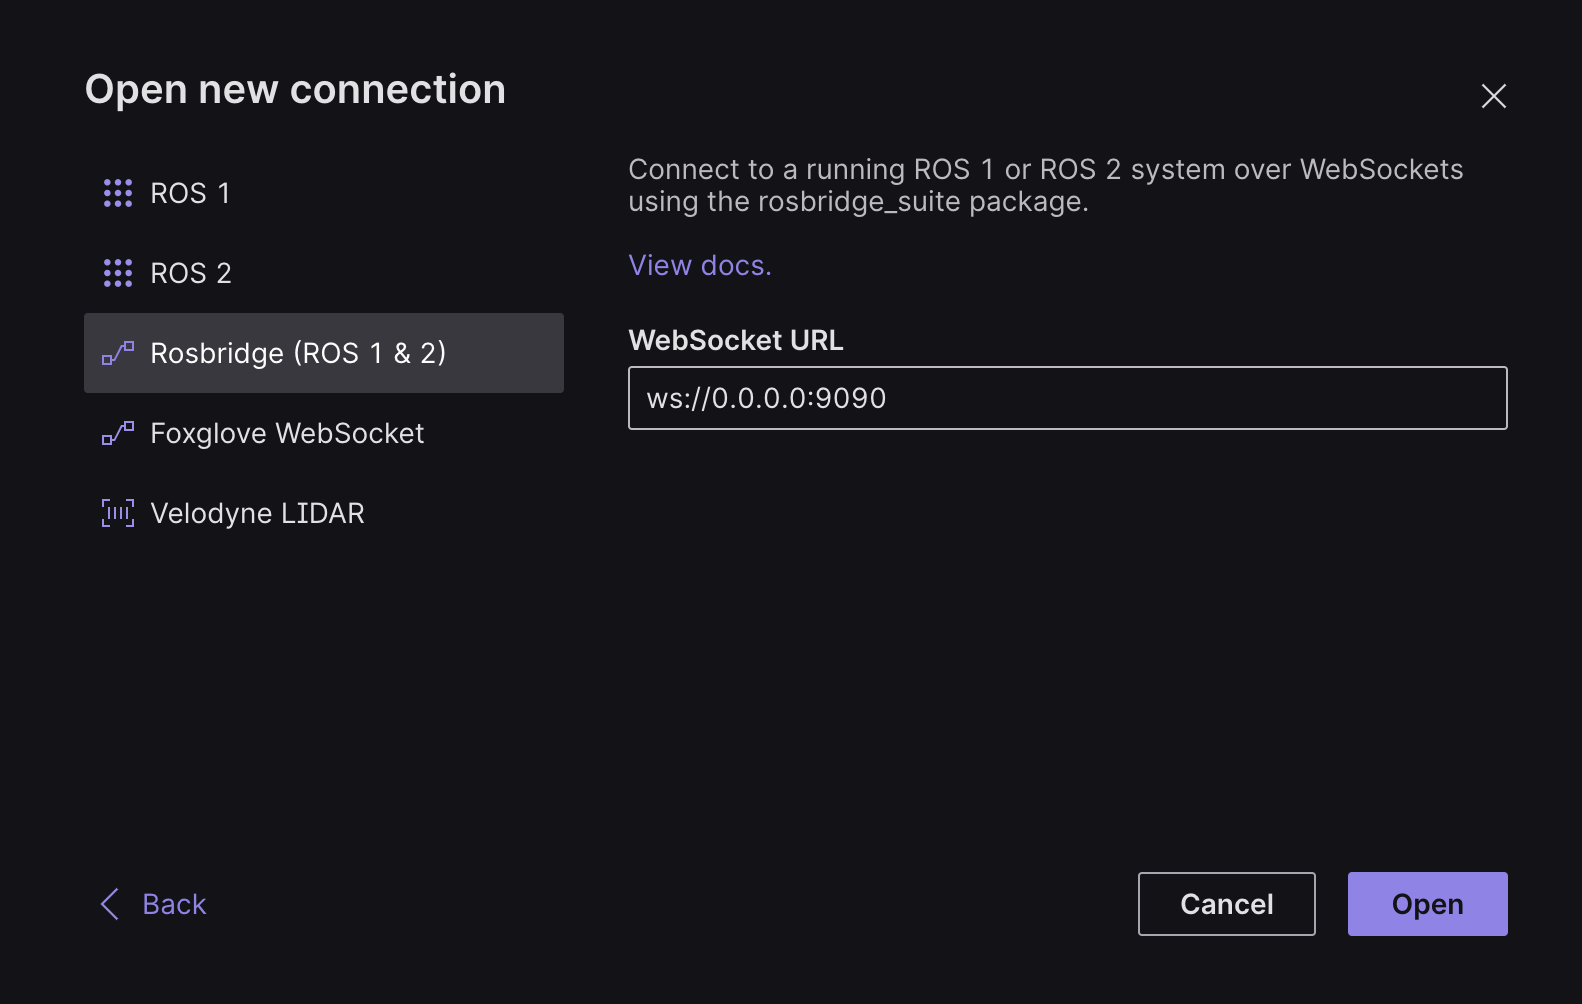
Fill out the WebSocket URL with the url and port that the simulator output before, as shown in the image. The URL may differ from pictured. Then, click Open in the bottom right corner. The left sidebar should show that a connection has been made. The map should update and the car pose arrow should appear in the map panel in the center. The car can be driven using the right teleop panel.
Moving the robot
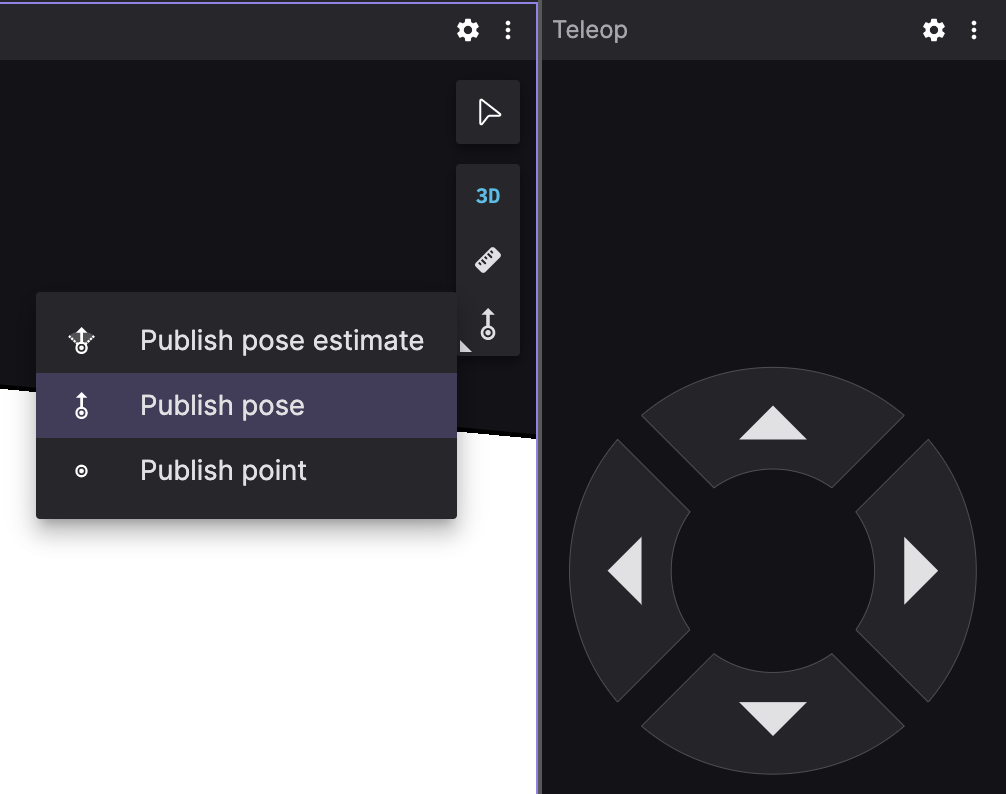
You may want to change the starting point of the robot. You’ll notice the panel in the bottom right which has a button called “Set Pose.” Make sure this is selected. Then, in the middle pannel, you’ll see a point button. You’ll want to change it from “Publish point” to “Publish pose,” as shown in the screenshot below. You can do this by pressing and holding the button. Then, you’ll be able to select the button, and set the pose by pressing on the map, once for location, and a second to specify the direction.
Uses of “Set Goal” and “Set Pose Estimate”
When attempting autonomous navigation (see this tutorial), “Set Goal” will allow you to specify a location the car should navigate to.
When running on a real robot, and the particle filter is having trouble localizing, you’ll want to use “Set Pose Estimate”. In simulation, the pose, or location of the car, is deterministic, but when running on the real robot using a particle filter, we only have access to the best estimate of the robot’s pose.
Changing the map
The map can be changed by editing the following file:
src/mushr_sim/launch/teleop.launch
In this file, edit the line:
<arg name="map" default="$(find mushr_sim)/maps/sandbox.yaml"/>
to specify a different map. MuSHR provides some basic maps, but if you want to map your own space, try the SLAM Tutorial for MuSHR.
Troubleshooting
Docker: Error while fetching server API version
Ensure that Docker is running. In your terminal, docker ps -a should not cause an error.
Docker: network mode is incompatible with port bindings
Navigate to the install directory mushr/mushr_utils/install. Edit the docker-compose-cpu.yml file in this folder to remove the line: network_mode: "host".
wlan0: Device not found
Edit the .bashrc file in the Docker container and manually set the ROS_IP to the IP of your Docker container.
One way to find this is to run the following command:
$ ifconfig
After manually setting this value, make to source the .bashrc in the Docker container.
$ source ~/.bashrc
ERROR: Get https://registry-1.docker.io/v2/: dial tcp: lookup registry-1.docker.io on [::1]:53: read udp [::1]:42546->[::1]:53: read: connection refused
This error seems to stem from a nameserver issue. Add the following to /etc/resolv.conf
nameserver 8.8.8.8
nameserver 8.8.4.4
FAQ
I installed some packages in my docker container, how can I “save” them for next time I run mushr_noetic
You can save this using the docker commit command. First find your container ID
$ docker ps
It should be the only one or the one with mushr/mushr:XXX under the image name (XXX different on different systems). Now commit the CONTAINER ID to the IMAGE name. For example:
$ docker commit de878d464895 mushr/mushr:x86_64