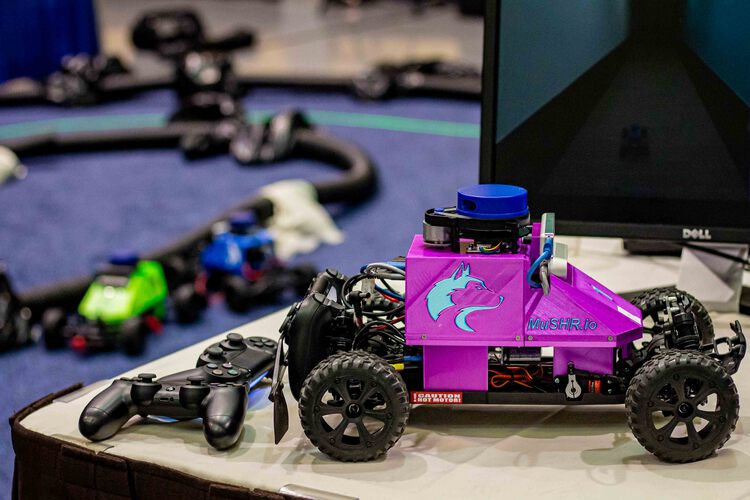
Techniques for devloping and troubleshooting with the cars.
Beginner Tutorial | Expected duration is 30 minutes
By: Matt Schmittle
Introduction
Goal
To learn common workflows with the software stack to speed up development on your own projects. It will also cover common problems and troubleshooting tips and tricks.
Requirements
You can choose to use this tutorial as a reference or to follow along on your car to see for yourself how the various tools work.
Table of Contents
This tutorial consists of four core parts:
- Common Workflows introduces you to effective strategies for setting up and using the car in simulation and the real world for the purposes of developing new algorithms and collecting data.
- Troubleshooting helps speed up the diagnostic process for when things go wrong. We give you a series of questions to help narrow down your issue.
- Debugging Tools provides a summarized reference for ROS diagnostic tools we can’t do without. We share the commands we frequent and their functions.
- Common Issues & How to Fix contains issues you’re sure to encounter and proposals for fixing them.
See something that’s missing or have a suggestion for improving this guide? Contact us with your suggestion!
Common Workflows
There are two common workflows, in sim and in the real world. Sim is easier because you do not need to connect and communicate with the car over the WiFi. We recommend getting comfortable working in sim before trying to test on the car.
Simulation Workflow
To work in sim you need to have either have the docker image working or an Ubuntu machine with ROS melodic that has mushr_sim, mushr, mushr_base, vesc and rviz installed. The Docker container is straight-forward to set up, but if you don’t like working in a container we recommend the latter. Each has a slightly different workflow covered below.
Docker Container
If you have set up the docker container through the quickstart tutorial then to get the sim running simply enter mushr_sim/docker and run:
$ docker compose up -dThe default .rviz file has the basic topics, but you can save a more custom one if you like. If you exit rviz/sim the container will stop. You can always restart it with
$ docker start CONTAINER-IDAnd you can get your CONTAINER-ID 1 by running:
$ docker psWe recommend storing your code on a git repository so it is easier to move it from container to container. To enter the container to edit or run your code execute:
$ docker exec -it CONTAINER-ID bashThis will get you a non-root user shell to edit and run code. If you wish to install additional software, enter the container as root:
$ docker exec -it -u 0 CONTAINER-ID bashThe reason we have two different users is that developer is tied to the host computer user so that gui apps like rviz, and the sim gray box can come through.
You can save your container to an image with
$ docker commit CONTAINER-ID IMAGE-NAME You may want the container to not run the sim and rviz when you start it. To change it to just turn on change line 16 docker-compose.yml to
entrypoint: bash Docker has a bunch of resources for going further with containers and images. Checkout their docs for further resources!
Regular Install
Use these instructions to operate the simulator on an Ubuntu system where ROS melodic and mushr_sim, mushr, mushr_base, vesc and rviz are installed.
$ roscoreThe above command starts the ROS master that the other programs will latch to. If you don’t run this then rviz can act up. Why? Because rviz needs a rosmaster to talk to and if the rosmaster is teleop, or some other node then when you restart, rviz will lose its connection with ROS master. Now start rviz:
$ rvizIdeally you want to open your previously saved .rviz file (file → save as) that has your most commonly used topics all set up. But if not then wait until everything is running, subscribe, then save a file. Also, because you are working with a 2D map, make sure the camera is set to TopDownOrtho.
Launch the sim and the map server:
$ roslaunch mushr_sim teleop.launch Launch your code:
$ roslaunch your_package your_launchfile.launchSubscribe to all the necessary topics (and save a .rviz file!). All topics can be found by clicking Add → By topic. To get the robot model: Add → By display type → RobotModel. Use the gray box and the W, A, S, D keys to drive
If you need to restart or edit your code then make sure to reset the rviz topics so you get the most up to date data. This can be done by pressing the reset button in the bottom left corner. When finished with your session, press q in the gray box.
Real World Workflow
Operating the robot in the real world has a similar process to that of simulation, but with added hardware setup and connecting remotely. The key to a solid workflow is to make sure to separate hardware and software failures clearly which is something that we will discuss more in the next section.
The first step is to make sure both batteries have sufficient charge (not dead at least). When the batteries are charged the VESC will blink 3 times when connected and powered. The below image show batteries in a charged state. When charging there should be a solid red light (hold start/stop to toggle). The solid green light indicates full.
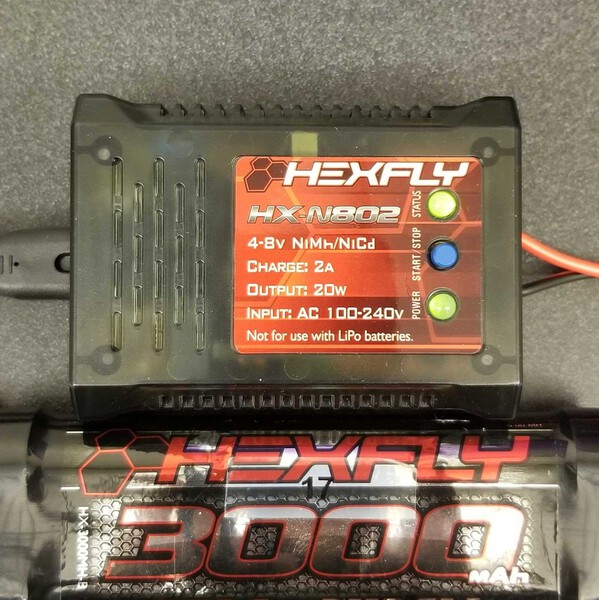
Batteries in a charged state. A solid red light indicates charging; solid green light indicates full.
Once you have comfirmed that your batteries are charged, you have eliminated many of the most common issues. The next thing to do is to plug in the batteries starting with the VESC. If you want to start right into teleoperation then hold the front button until you see the lidar spin (approximately 1 minute). Once you have plugged both batteries in, you should see the vesc and the Jetson Nano light up. If the Nano does not light up (and the battery is charged) check to make sure the barrel connector is plugged in.
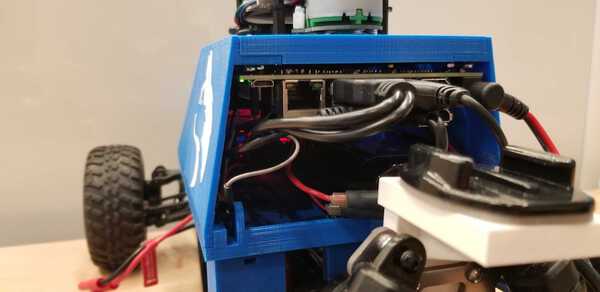
Green light on nano indicates the computer is powered and on.
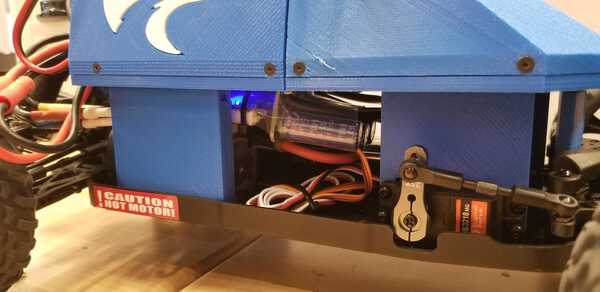
Blue light on vesc indicates vesc is on. The wheels will also straighten.
Now it is time to connect to the computer! If you have the default network setting where the robot makes its own network then connect to “Robot AP” and ssh into the car.
$ ssh robot@10.42.0.171If you have the robot setup connect to a local network (see Robot Setup Tutorial), then connect to the local network yourself and ssh but replace the IP with the robot’s static IP that you set.
If you are having trouble connecting see Troubleshooting. We need to set up the ROS_IP and the ROS_MASTER_URI environment variables on both devices. ROS_IP tells your ROS node what IP to communicate under. Localhost will not work because it will prevent remote components from communicating with it. So use ifconfig in the terminal to find your IP (car and desktop) and set that number to your ROS_IP. Each device should use its own IP.
$ export ROS_IP=ROBOT/DESKTOP-IPIf your IP is static (the car ought to have a static IP) then you can put this command at the bottom of your ~/.bashrc and it will run everytime you log in. You can check if an environment variable is set using echo
$ echo $ROS_IPNow that you have set your ROS_IP for both the car and computer, we need to set the ROS_MASTER_URI environment variable. The ROS_MASTER_URI tells your ROS nodes where to look for rosmaster. The default is localhost:11311. Since your program is running on the car we will set the ROS_MASTER_URI to the car. Luckly because the car is already set to itself, we only have to set the desktop or laptop (whichever is your remote workstation). On the base computer run:
$ export ROS_MASTER_URI=http://ROBOT-IP:11311“11311” is the port ROS connects to, and ROBOT-IP is the robot’s IP address you ssh with to connect to the car. If this isn’t set your base computer will start a separate rosmaster and if it is set incorrectly it will throw a error that it cannot find rosmaster. Now we are ready to run stuff!
Ssh into the car, and run:
$ roscoreOn the base:
$ rvizrviz should be setup to listen to the same topics as the simulator
On the car:
$ roslaunch mushr_base teleop.launchThe teleop.launch launch file activates the car’s hardware, sensors and remote control. Make sure you can drive the car and steer. On the base, visualize topics in rviz.
On the car:
$ roslaunch your_package your_launch.launchIt is good practice to make a ros package for your code that is separate from the mushr_base package. That way if you need to update mushr code, your code remains unaffected. This can be done by making a separate catkin package.
Troubleshooting
Troubleshooting is what 80% of a roboticist’s time is spent on. If we know it is inevitable, we need to design systems and use tools to narrow down a diagnosis for the problem as fast as possible. Diagnosis can usually be the hardest part because it could be hardware or software or both. In addition, a robotic system is highly interconnected so a weird behavior in one component may only manifest itself in another component down the road. This section will cover the main debugging tools you should use on the car and some common problems and fixes.
Debugging Questions
You should try answering the following questions in order to work towards a diagnosis.
Is the issue hardware or software?
Very important question, as your fix will change drastically. There are usually clues into this problem. Let’s look at an example:
[FATAL] [1455208235.408745600]: Failed to connect to the VESC, SerialException Failed to open the serial port to the VESC. IO Exception (2): No such file or directory, file /tmp/binarydeb/ros-kinetic-serial-1.2.1/src/impl/unix.cc, line 151. failed..Now this issue is hardware. There is a key clue here, the word “IO Exception.” We know the VESC is not connected because we can’t start a serial connection with the VESC. Here is another example:
ERROR: unable to contact ROS master at [http://172.16.77.06:11311]
The traceback for the exception was written to the log file
Now this is also a connection issue, but this time it is software. We know because the ROS node is trying to connect to rosmaster at the set IP. So in software we are setting this IP from the environment variable ROS_MASTER_URI and the computer is trying to connect to this IP over WiFi. Either we set the IP wrong, or the WiFi isn’t working. But we know the WiFi is functional because we can ssh into the car, so it must be an incorrect IP!
What component is causing the issue?
So now that you have determined that the issue is in hardware vs. software, we need to narrow down the problem. Sometimes, in the above examples, it explicitly tells you, but we aren’t always that lucky. Take the following example:
[teleop.launch] is neither a launch file in package [labx] nor is [labx] a launch file name
The traceback for the exception was written to the log file
So this points to labx being the component (package in this case) that is not working. Turns out that is slightly a red herring. So this error means ROS cannot find the launchfile or the package. So it could be one of two things or both. teleop.launch is not in labx in which case labx was the culprit. And/or you haven’t sourced your workspace since making this package so ROS does not have it in its package list. We can narrow this down by doing the following:
$ rospack find labx
/home/nvidia/catkin_ws/src/labx
It found the package! Which means you don’t have a teleop.launch file in your labx package. To fix this, you would need to go to the labx package.
$ roscd labx/launchAnd see if you have mispelled teleop.launch. If there is no file matching teleop.launch then you would have to make one.
Is the error ROS related or pure code related?
A helpful thing to determine is if the problem has anything to do with ROS. If the error looks like a standard python/C++ error then great, you can rule out all ROS stuff. If not, then it could be either your ROS interface (publishers/subscribers) in your code, or your launchfiles, or your ROS environment. This question is relatively easy to answer if you answer the previous questions. But the one difficulty is that ROS will add a bunch of node failure gibberish even if your code logic is the problem. So just make sure to scroll the error to the very beginning to find the core issue.
Debugging Tools
ROS provides a suite of tools to help debug issues. We’ll cover each a bit and when to use.
rostopic
This tool is really useful for checking if topics are publishing, get a sense of latency, see what is being published, and more info about specific topics.
| Command | Function |
|---|---|
rostopic list | allows you to see all the topic |
rostopic echo topic_name | allows you to see what is actually being published |
rostopic info topic_name | lets you see the message type and other important info about a topic |
rostopic hz topic_name | lets you see the publish rate of the topic. A quick way to detect a bottleneck. |
Give this a try as you're getting acquainted with your system!
rosnode
This tool works very similar to rostopic except on a node level. It is useful to see what nodes are publishing/subscribing to.
| Command | Function |
|---|---|
rosnode list | list all the ROS nodes |
rosnode info node_name | see what the node is publishing/subscribing to and other important info |
rosparam
If you have params that are set dynamically (erpm gain) then this a good tool to make sure a param is what you expect it to be and if not change it.
| Command | Function |
|---|---|
rosparam list | list all params |
rosparam get param_name | get param value |
rosparam set param_name | set param value |
rospack
This tool is useful if you need to find a package.
| Command | Function |
|---|---|
rospack list | list all packages |
rospack find package_name | gives you the location of the specified package if it finds it |
rosrun tf
If you are having transform issues, this tool is a good way to debug.
| Command | Function |
|---|---|
rosrun tf tf_echo frame1 frame2 | will output the transform from frame1 to frame2 |
rosrun tf view_frame | will create a pdf diagram of the transforms present |
rosrun tf tf_monitor | show all frames and publish rates |
rqt_graph
This will give you a sense of the overall system of nodes and topics connecting them.
| Command | Function |
|---|---|
rqt_graph | creates pdf of nodes and topics running |
ssh
While this is not really a debugging tool, it is a tool commonly used and should be touched on. ssh stands for Secure Shell. It is an encrypted network protocol that amongst other things gives you a shell session on a remote machine. It is super useful for remote work and connecting to robots because then you do not need an additional monitor and keyboard. So when you connect, you supply the username (robot) and the IP address of the car and it will connect you to that user specifically. There are some other potentially useful things you can do with ssh in addition to a standard shell.
$ ssh robot@10.42.0.171 -XThis connects an X session so you can run graphical applications remotely, but it will be very slow because everything needs to be encrypted.
$ sftp nvidia@10.42.0.171Secure file transfer protocol is the best way to get files from another machine. It allows you to cd and ls like a shell but also get files and put files from your local machine on the remote machine.
tmux
The terminal multiplexer is a famous and commonly used tool for working with multiple shell sessions from one window. For us, this is particularly useful when you ssh into the car. You don’t have to keep sshing in for each new window, but instead ssh in once then use tmux to have multiple sessions. This tutorial goes into more detail.
Common Issues & How to Fix
Alright, now that we know how to narrow down issues, let’s look at the most common issues on the cars and how to fix them.
Vesc Failure
[FATAL] [1455208235.408745600]: Failed to connect to the VESC, SerialException Failed to open the serial port to the VESC. IO Exception (2): No such file or directory, file /tmp/binarydeb/ros-kinetic-serial-1.2.1/src/impl/unix.cc, line 151. failed..Hardware/Software: Hardware
Component: Vesc
ROS Related: No, but it manifests itself through ROS
Fix: Make sure the Vesc battery is charged and plugged in. The Vesc should have a blue light. If you have to change the battery, make sure to re-source your workspace so the computer can detect the vesc. If continues, check connections to the computer.
ROS Workspace Not Setup (bash not recognizing ROS commands):
-bash: roscore: command not found
Hardware/Software: Software
Component: ROS
ROS Related: Yes
Fix: source ~/catkin_ws/devel/setup.bash. We recommend putting this at the end of your ~/.bashrc so you never experience this issue.
Car Only Has Steering
Hardware/Software: Hardware
Component: Vesc Battery
ROS Related: No
Fix: Charge the Vesc battery, it doesn’t have enough juice to power the motor.
Car Drifts When Driving Straight
This can also manifest when using a particle filter that works in sim but not on the car because the expected control is to go straight when commanded straight. It could also manifest in a controller, when the car cannot seem to follow a trajectory because what it is commanding to the car is not what the car is doing.
Hardware/Software: Software
Component: Vesc config
ROS Related: No
Fix: edit the steering_angle_to_servo_offset in ~/catkin_ws/src/mushr/mushr_base/vesc/vesc_main/config/racecar-uw-nano/vesc.yaml to a value that when the car is commanded straight it goes straight.
ROS Topics Not Appearing in rviz
Hardware/Software: Software
Component: Your component/rviz
ROS Related: Yes
Fix: Either your component is not publishing the topic (use rostopic to double check!) or rviz needs to be refreshed or the transform is not publishing (rosrun tf to double check!). Click “Reset” in rviz and try restarting your node. If the error says not transform from x to /map then you need to make sure the transform is being published (use rosrun tf tf_echo! See Debugging Tools)
ssh Not Connecting
Hardware/Software: Hardware
Component: WiFi
ROS Related: No
Fix: If ssh is not working first do a dumby check to make sure your IP and username are correct. Then try to ping the car IP. If it does not respond, then make sure the car is powered. If powered and still not pinging, then it likely is struggling to pickup wifi. Plug a HDMI cable into the jetson and use ifconfig to confirm wifi. If nothing still, then use the graphical interface to try to connect to wifi. Also, make sure your base computer is on the same network as the car.
Roscore Already Running
roscore cannot run as another roscore/master is already running.Hardware/Software: Software
Component: ROS
ROS Related: Yes
Fix: You left a ROS process running and tried to start a new roscore/node. Simply stop that process.
$ pkill rosCONTAINER-IDis just a stand in for the value provided by the commanddocker ps. ↩︎